Challan Form (CRN) service User Manual is made available to all the users
Challan Form (CRN) service User Manual is made available to all the users The Generate Challan Form (CRN) service is available to all the users. With…
Table of Contents
Challan Form (CRN) service User Manual is made available to all the users
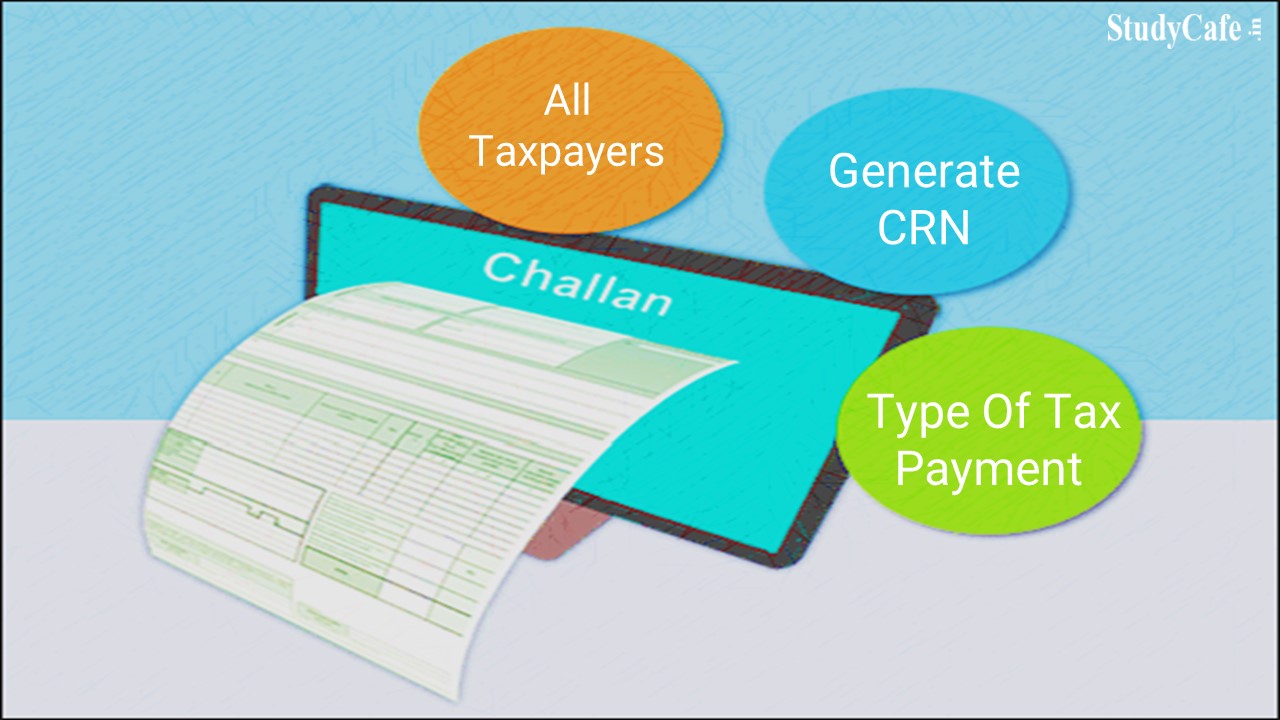
The Generate Challan Form (CRN) service is available to all the users. With this service, you will be able to generate a Challan Form (CRN) and subsequently make a tax payment for a selected Assessment Year and type of tax payment (Minor Head).
Users for this service include:
(i) All Taxpayers.
(ii) Type-1 and Type-2 ERI / CA.
(iii) Representative Assessee.
(iv) Tax Deductors / Collectors.
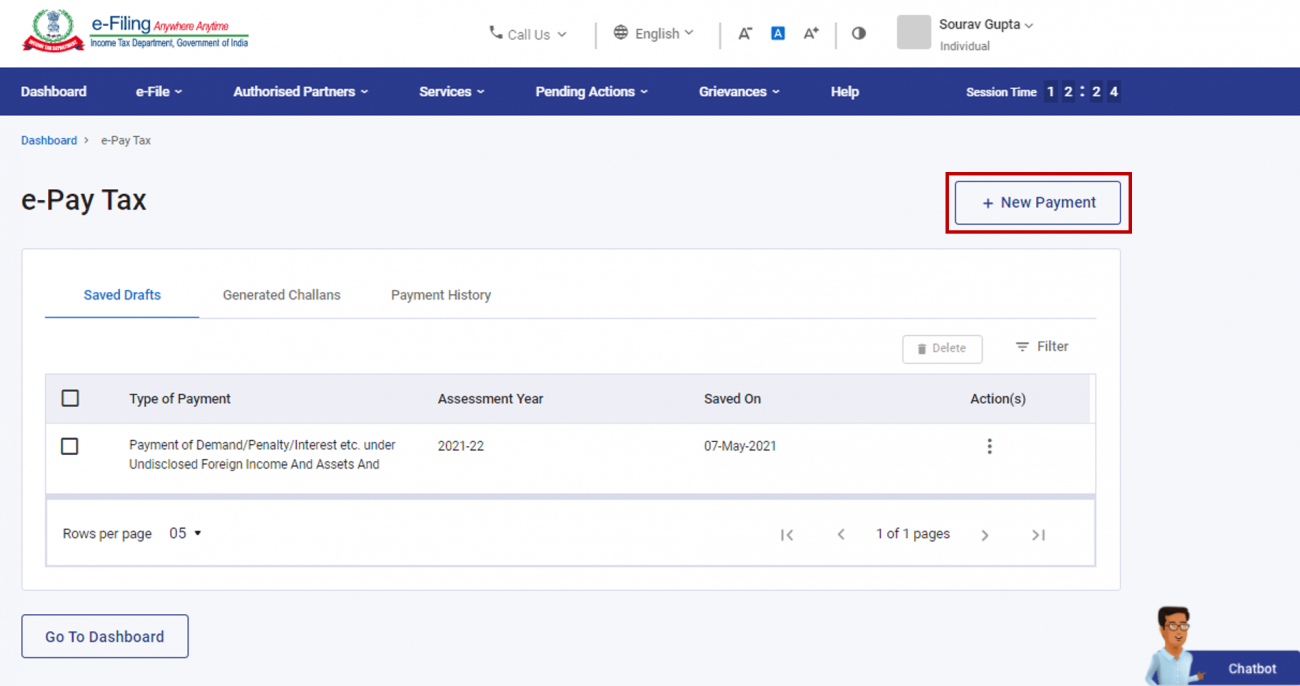
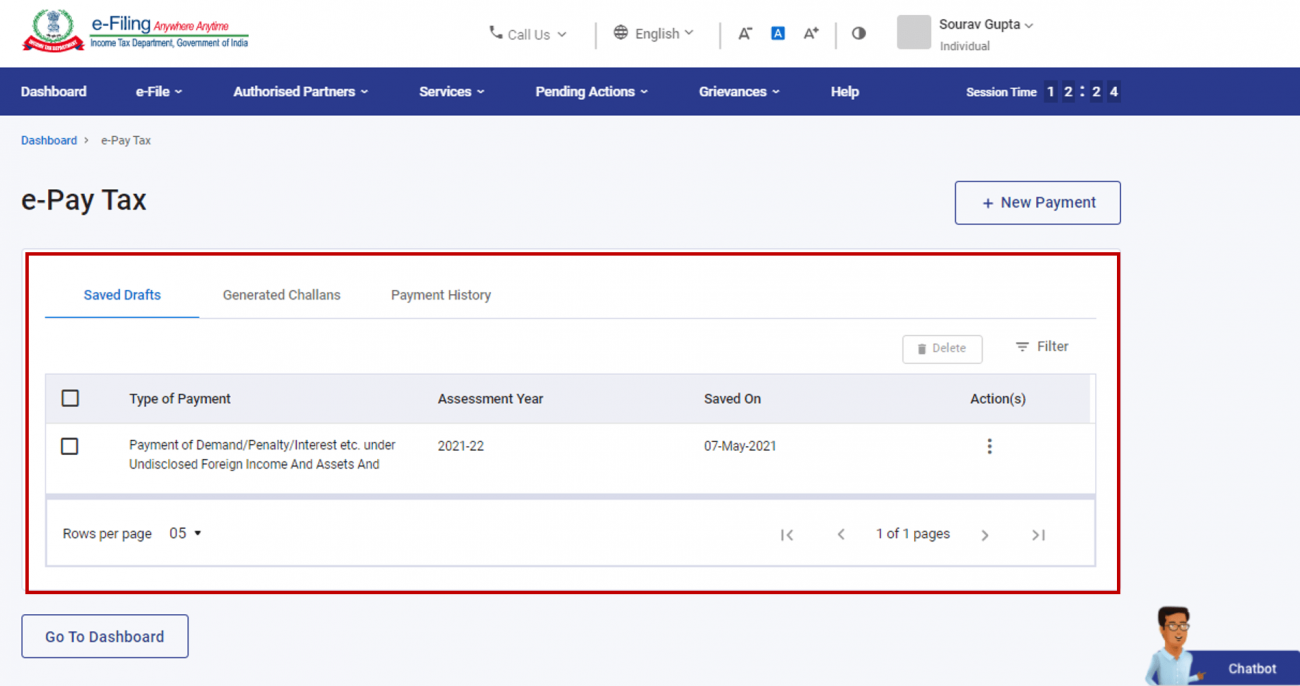
 Step 2: On the Dashboard, click e-File > e-Pay Tax. On the e-Pay Tax page, you can view details of Saved Drafts, Generated Challans and Payment History.
 Step 3: On the e-Pay Tax page, click the New Payment option to create a new Challan Form (CRN).
 Step 4: On the New Payment page, click Proceed on a tax payment tile that applies to you.
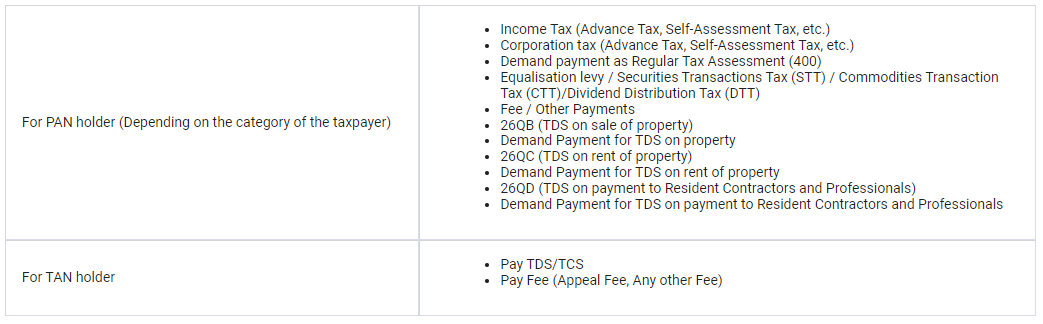
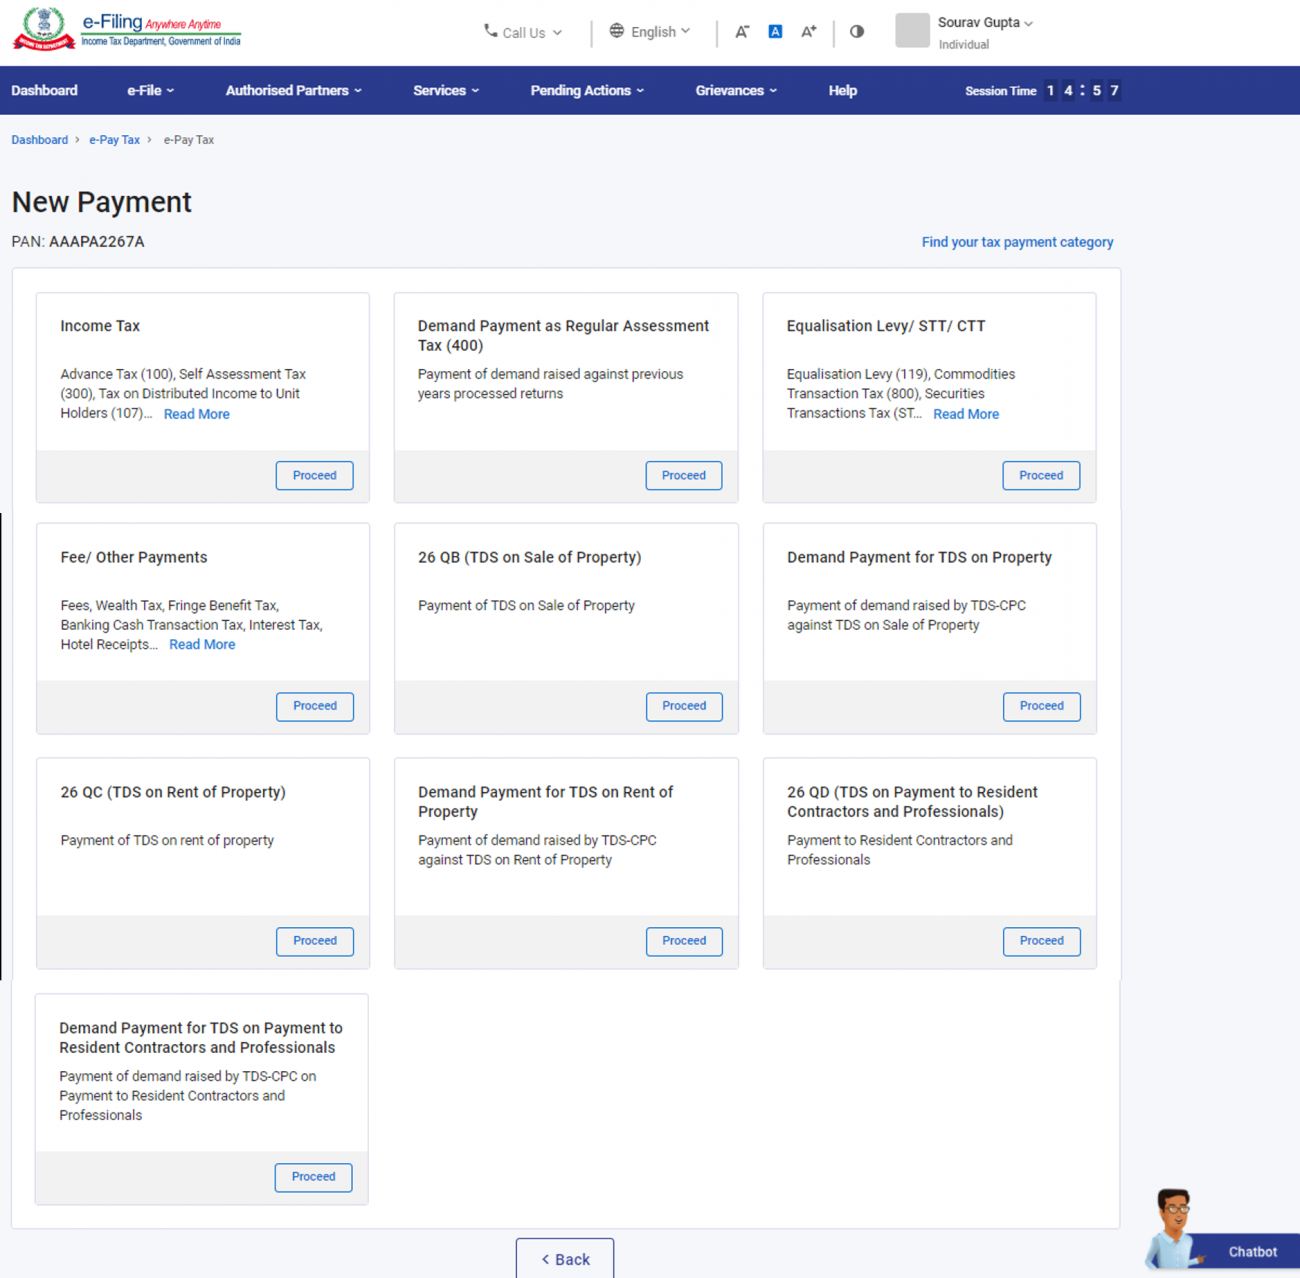 Note: In case you are not sure of the category, you can find the applicable category by clicking on the Find your tax payment category tab.
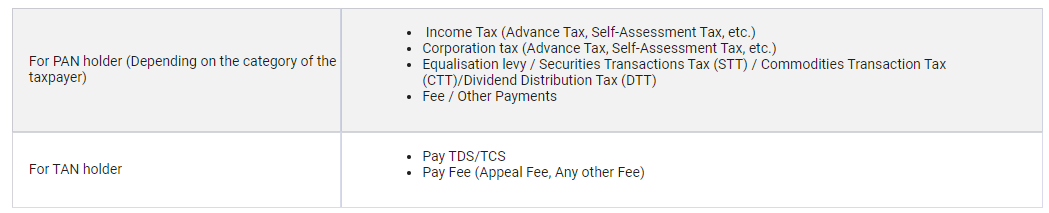
Depending on the category, you will be able select from the following Type of Payment:
Note: In case you are not sure of the category, you can find the applicable category by clicking on the Find your tax payment category tab.
Depending on the category, you will be able select from the following Type of Payment:
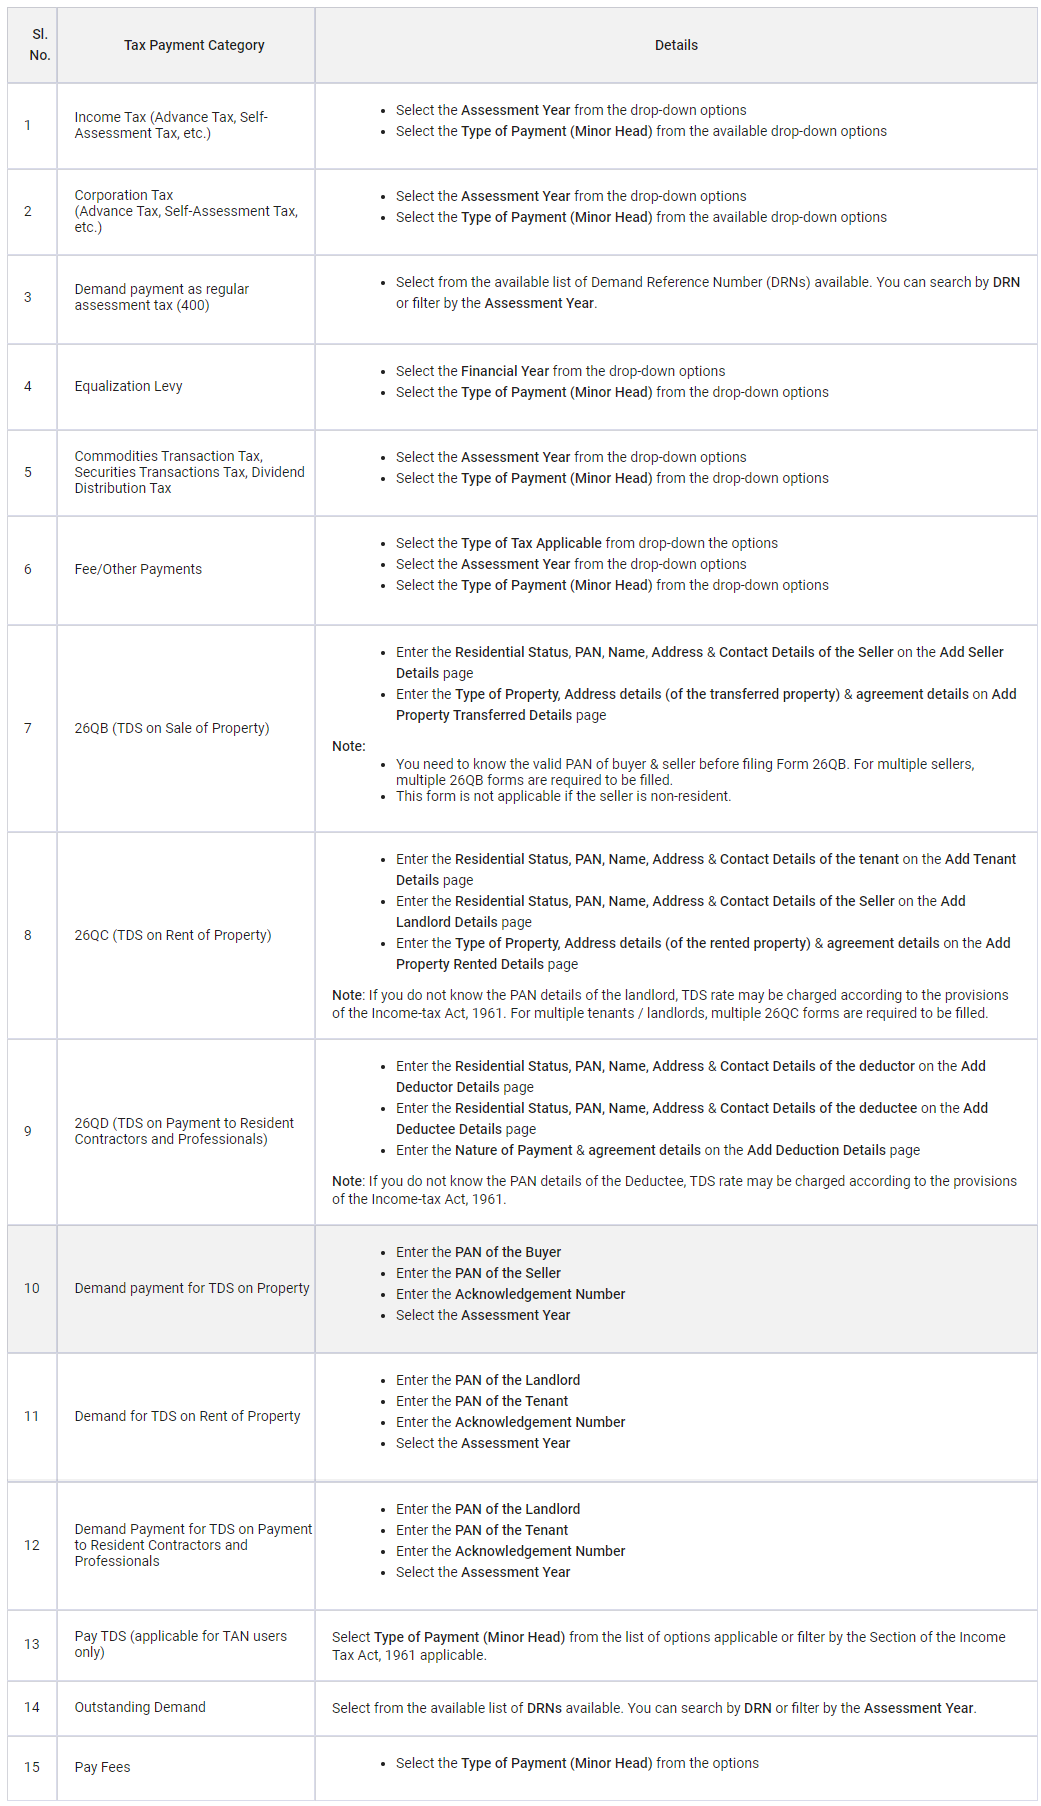
 Step 5: After selecting the applicable Tax Payment tile, enter the details as per the table below and click Continue.
 Step 6: On the Add Tax Breakup Details page, add the breakup of total amount of tax payment and click Continue.
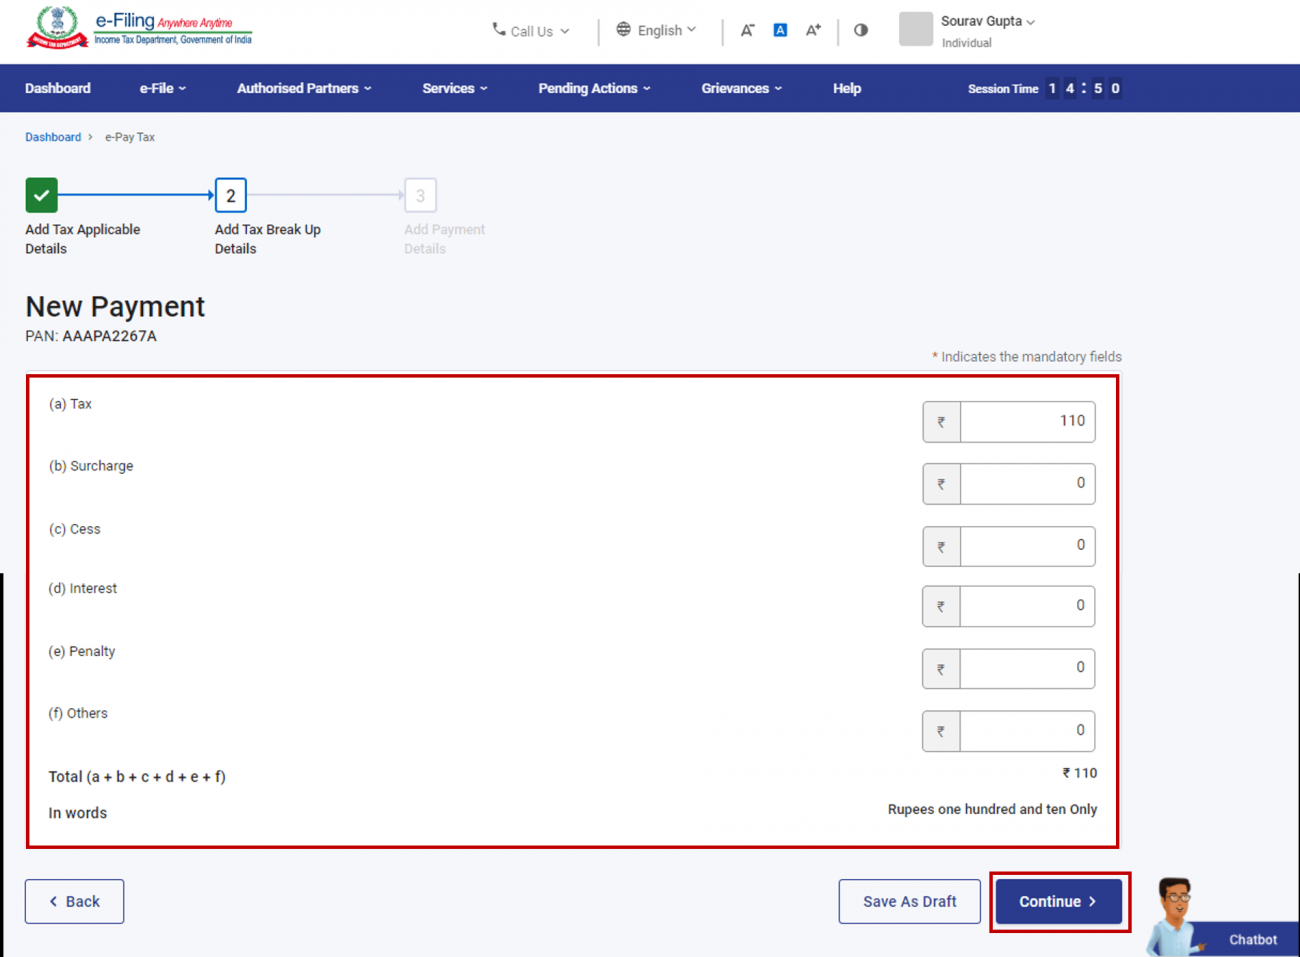 Note: The total of break-up has to be a NON-ZERO amount.
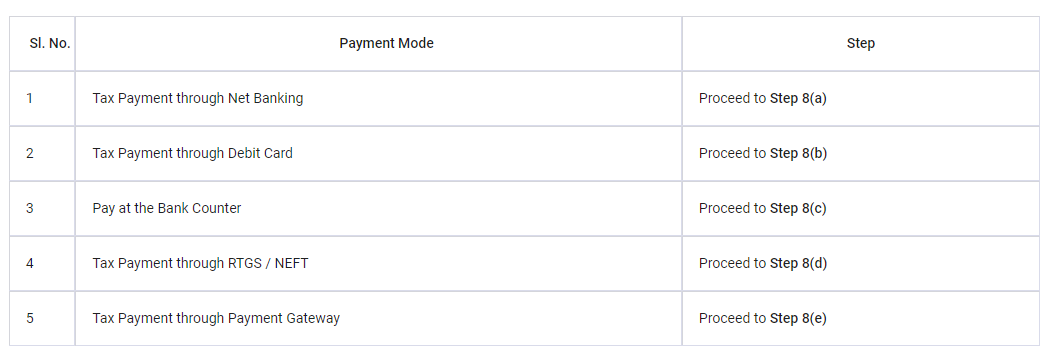
Step 7: You will be required to select the payment mode though which payment is proposed to be made. Five modes of payments are available, as explained below.
Note: The total of break-up has to be a NON-ZERO amount.
Step 7: You will be required to select the payment mode though which payment is proposed to be made. Five modes of payments are available, as explained below.
 Note: Once a payment mode is chosen for a Challan Form and Challan Reference Number (CRN) is generated for it, the payment mode cannot be changed later during payment.
Step 8 (a): For payment through Net Banking (of authorized banks)
A. On the Select Payment Mode page, select the Net Banking menu and select the Bank Name from the options. (If your bank name is not displayed as one of the radio options, select it from the dropdown menu of Other Bank) & click Continue.
Note: Once a payment mode is chosen for a Challan Form and Challan Reference Number (CRN) is generated for it, the payment mode cannot be changed later during payment.
Step 8 (a): For payment through Net Banking (of authorized banks)
A. On the Select Payment Mode page, select the Net Banking menu and select the Bank Name from the options. (If your bank name is not displayed as one of the radio options, select it from the dropdown menu of Other Bank) & click Continue.
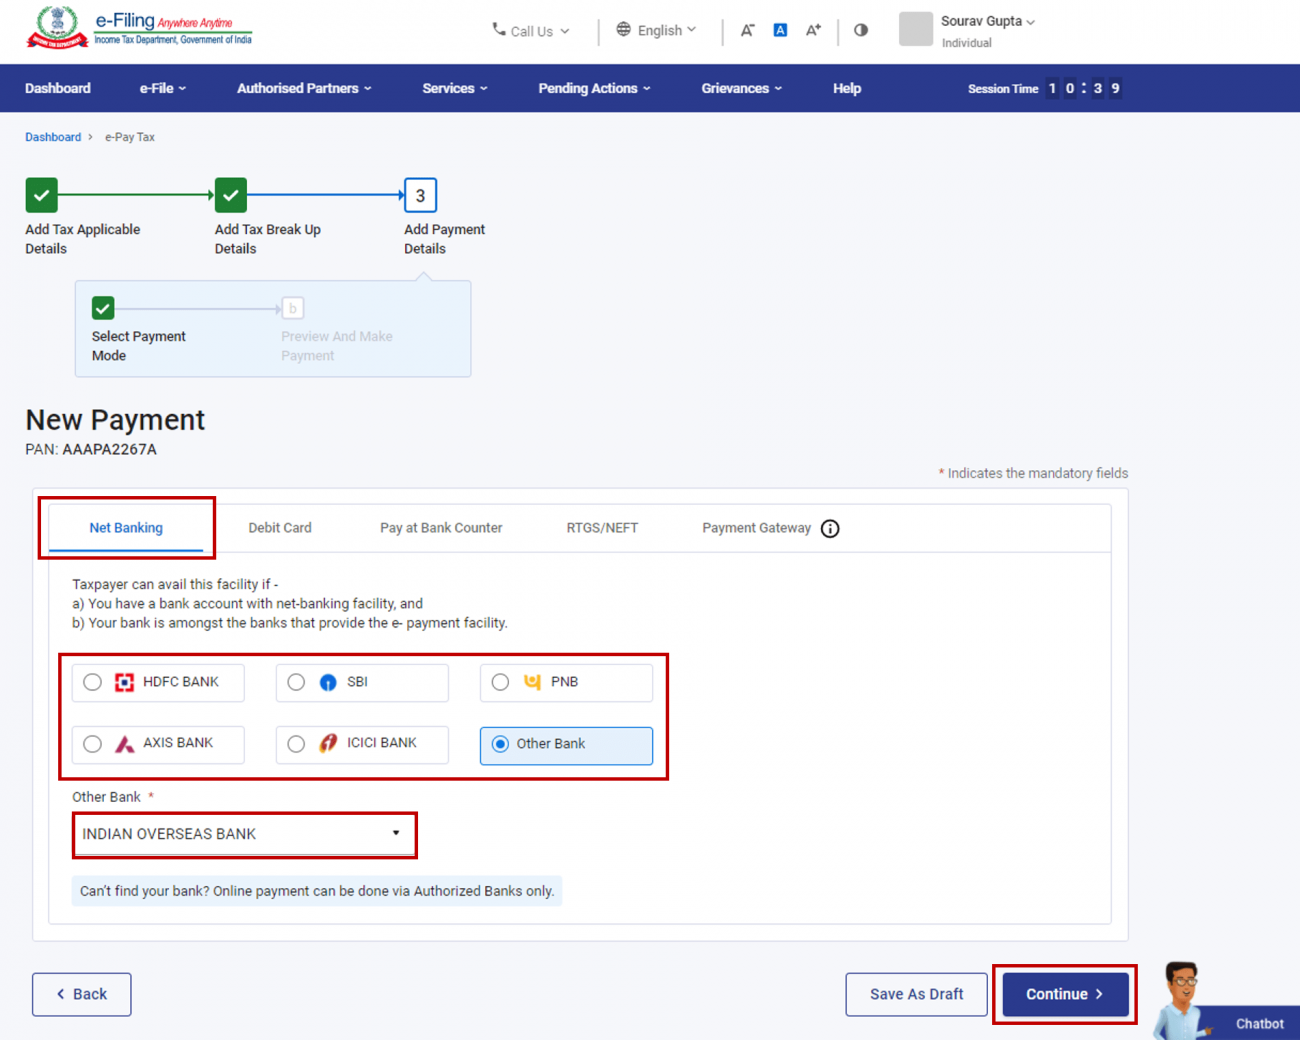 Note: This facility is available for Authorized Banks only. If your bank is not authorized bank, RTGS / NEFT or Payment Gateway mode can be selected for tax payment.
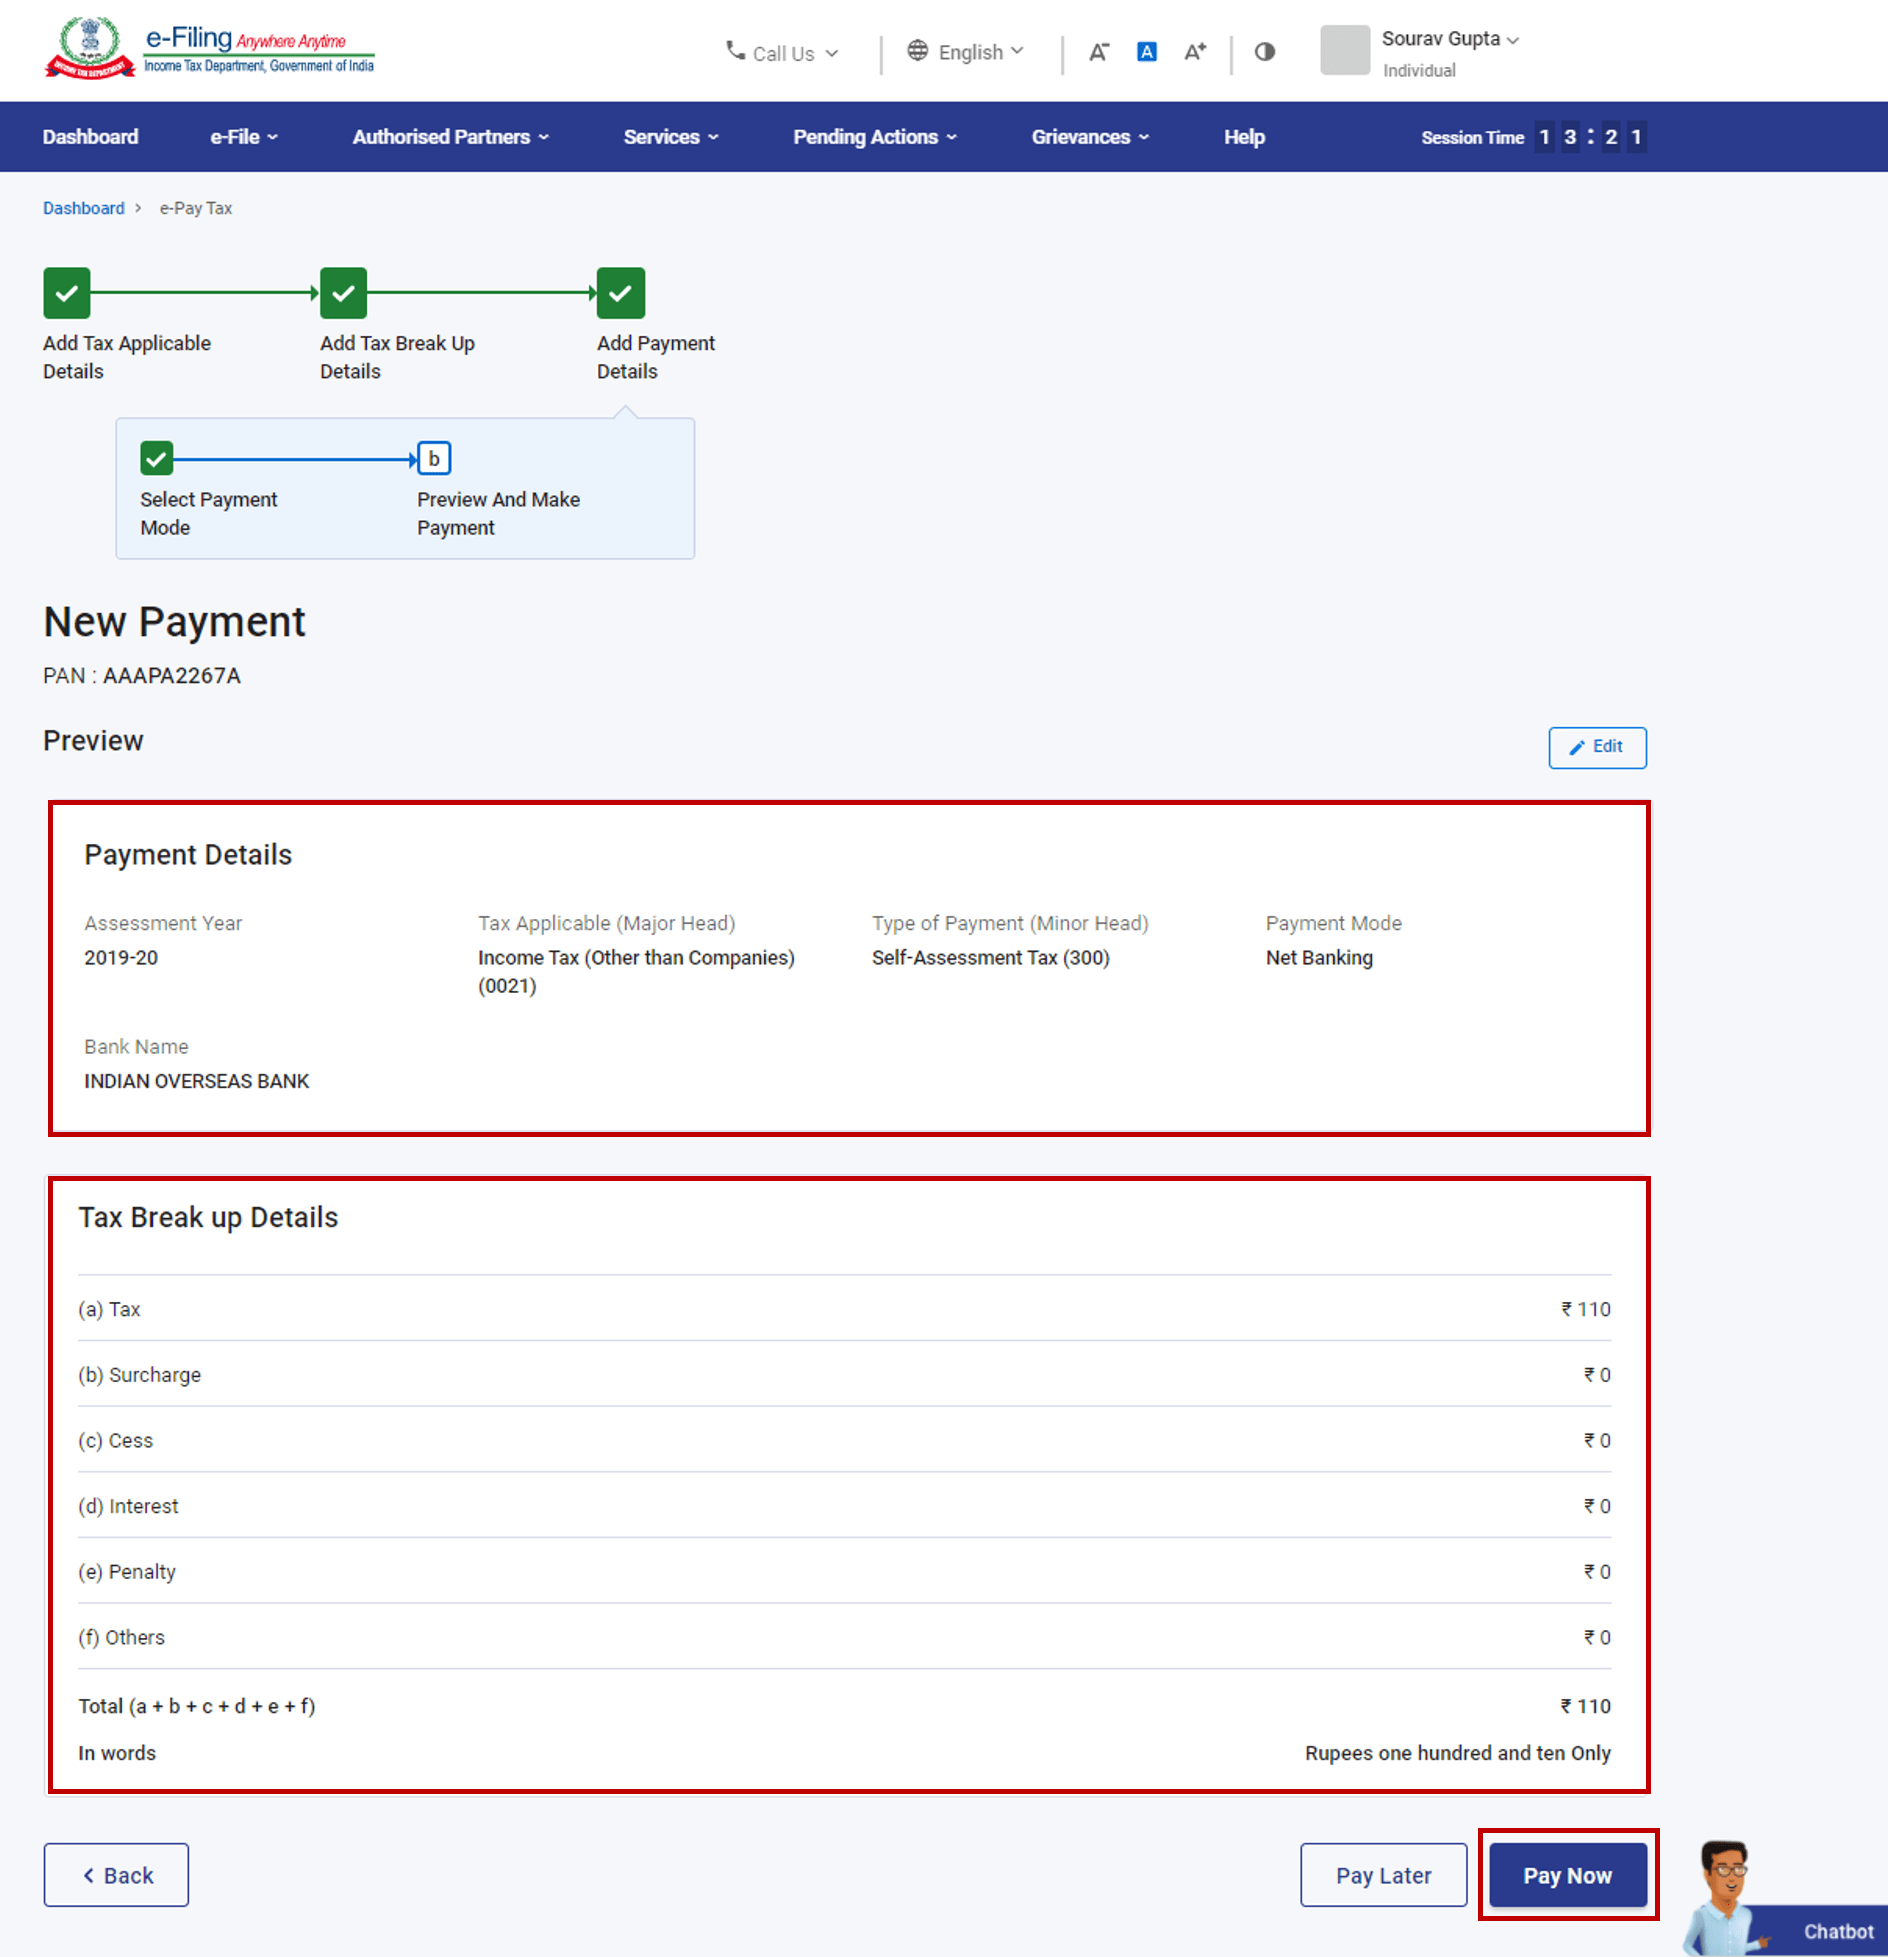
B. On the Preview and Make Payment page, verify the payment details and tax break up details and click Pay Now.
Note: This facility is available for Authorized Banks only. If your bank is not authorized bank, RTGS / NEFT or Payment Gateway mode can be selected for tax payment.
B. On the Preview and Make Payment page, verify the payment details and tax break up details and click Pay Now.
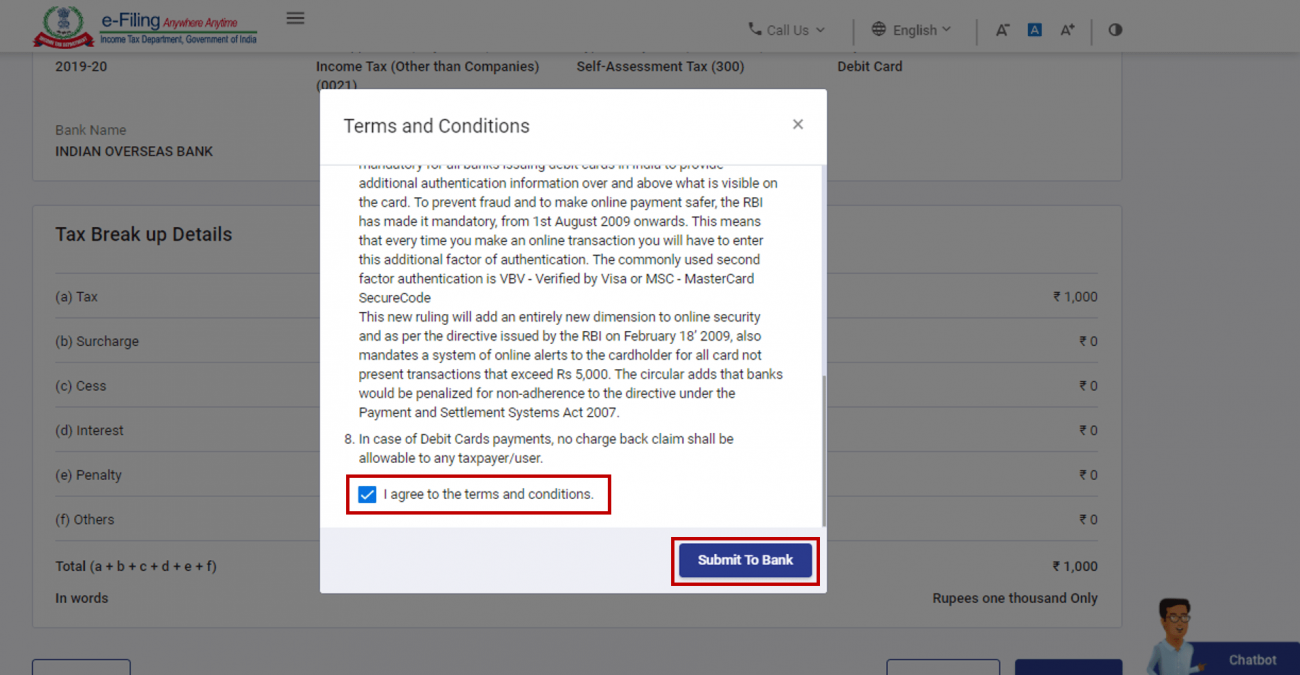
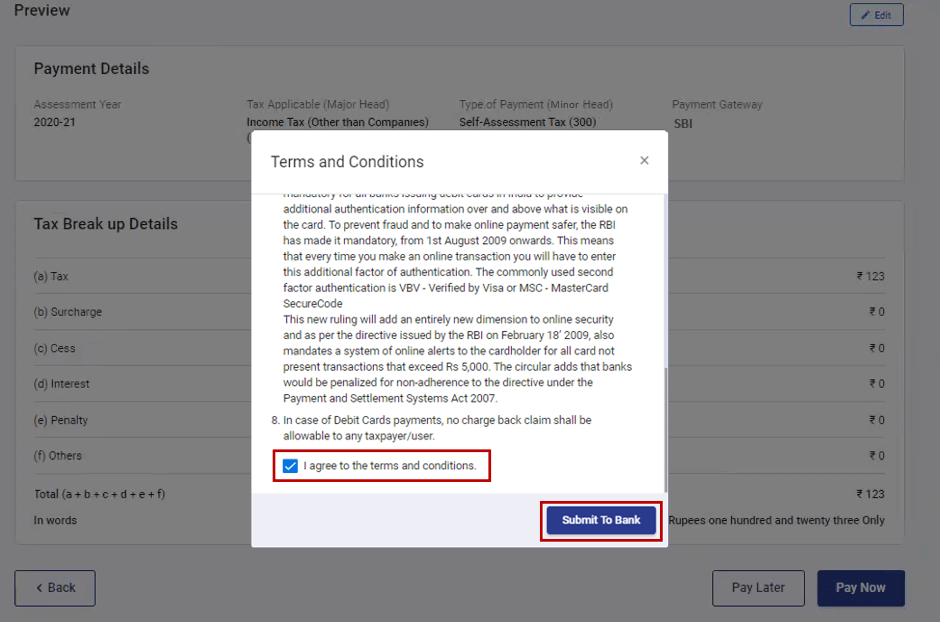
 C. Read and accept the Terms and Conditions and click Submit to Bank. (You will be redirected to the website of the selected Bank where you can log in and make the payment.)
 After successful payment, a success message will be displayed. You can download the Challan Receipt for future reference. You will be able to view the details of payment made in the Payment History menu on the e-Pay Tax page.
 Step 8 (b): For payment through Debit Card (of Authorized Bank)
A: In the Debit Card menu, select the Bank Name from the options and click Continue.
Step 8 (b): For payment through Debit Card (of Authorized Bank)
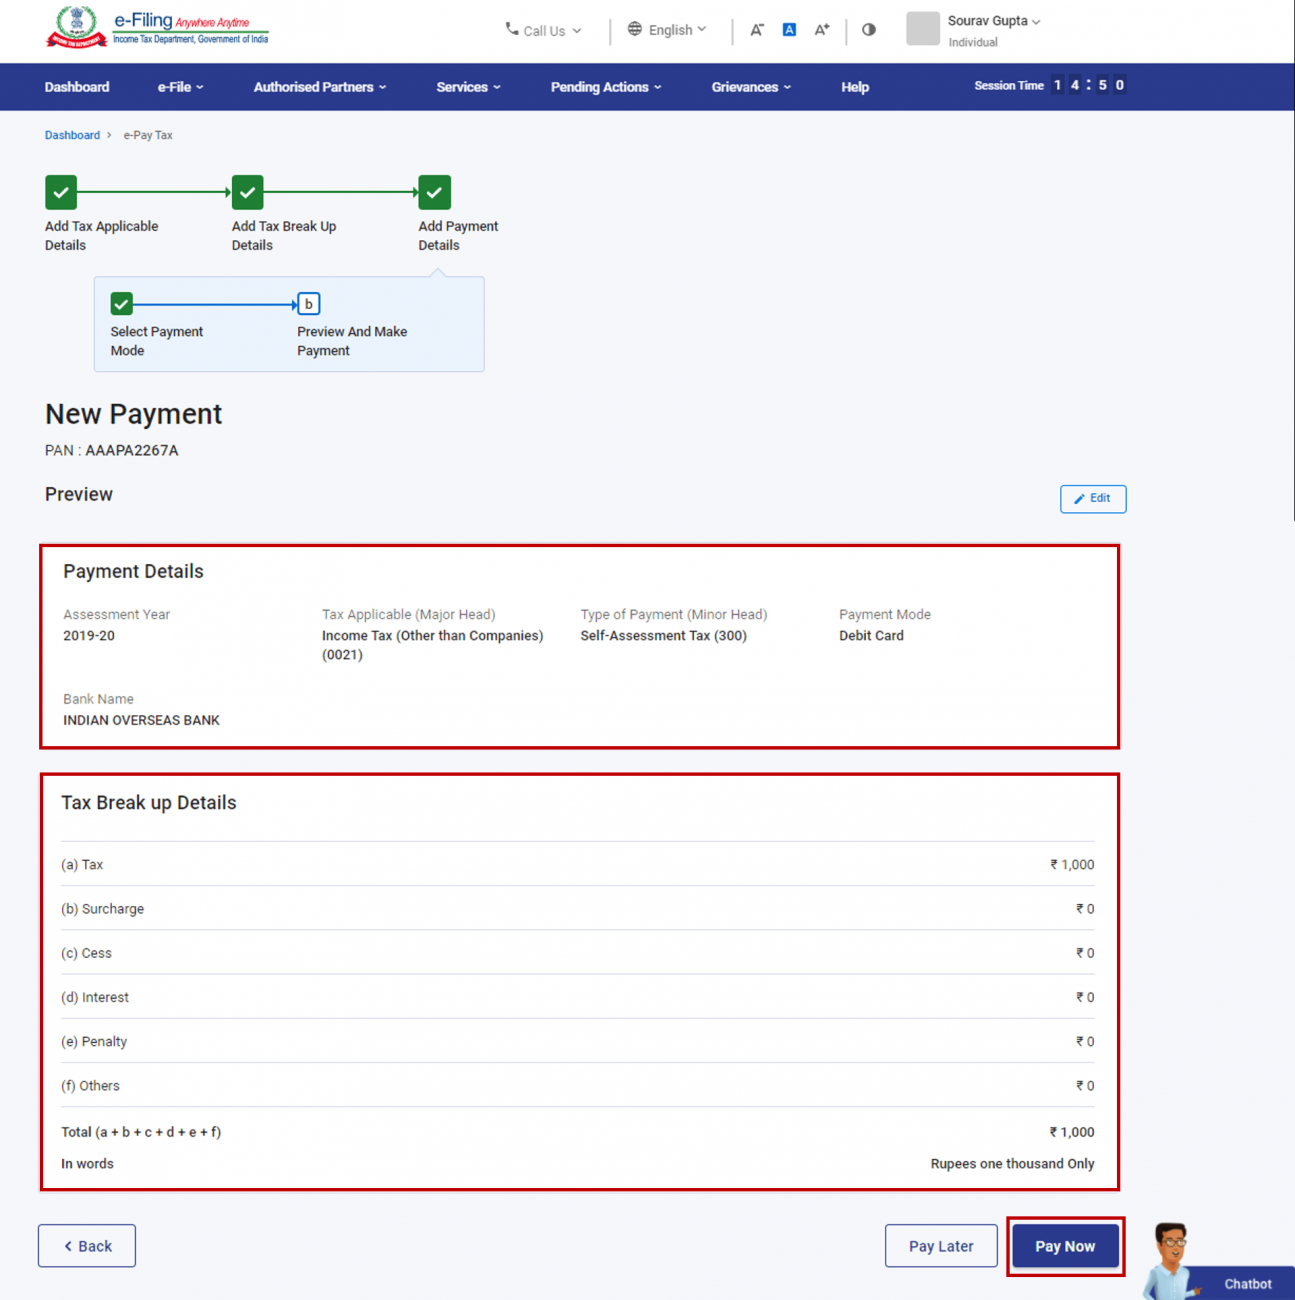
A: In the Debit Card menu, select the Bank Name from the options and click Continue.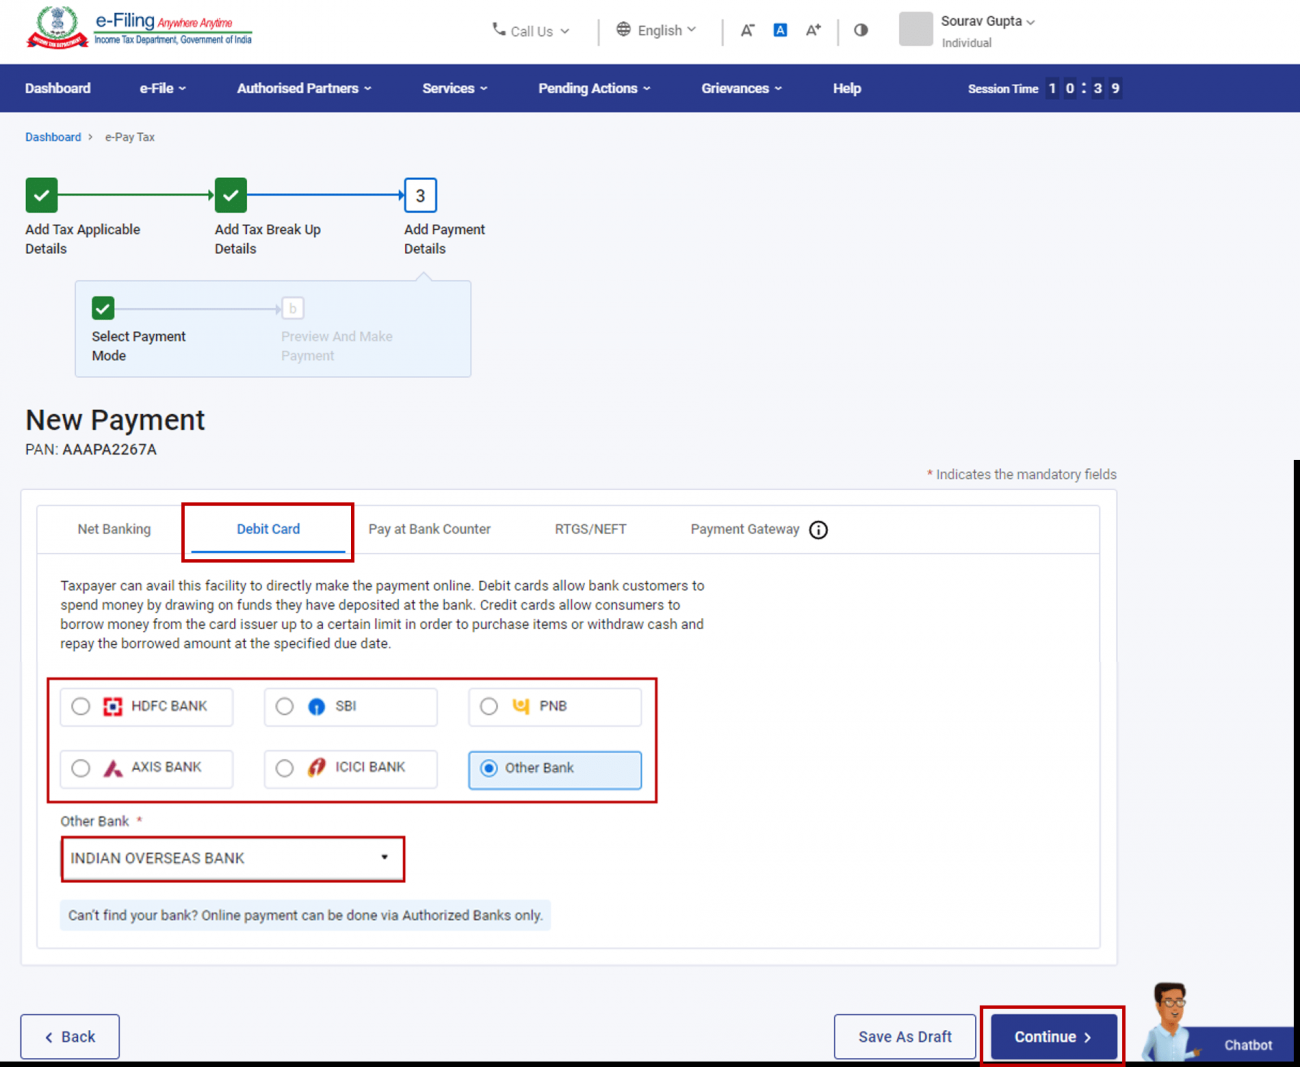 B: On the Preview and Make Payment page, verify the payment details and tax break up details and click Pay Now.
 C: Read and select the Terms and Conditions and click Submit to Bank. (You will be redirected to the website of your selected Bank where he can enter his debit card details and make the payment.)
 After successful payment, a success message will be displayed. You can download the Challan Receipt for future references. You will be able to view the details of payment made in the Payment History menu on the e-Pay Tax page.
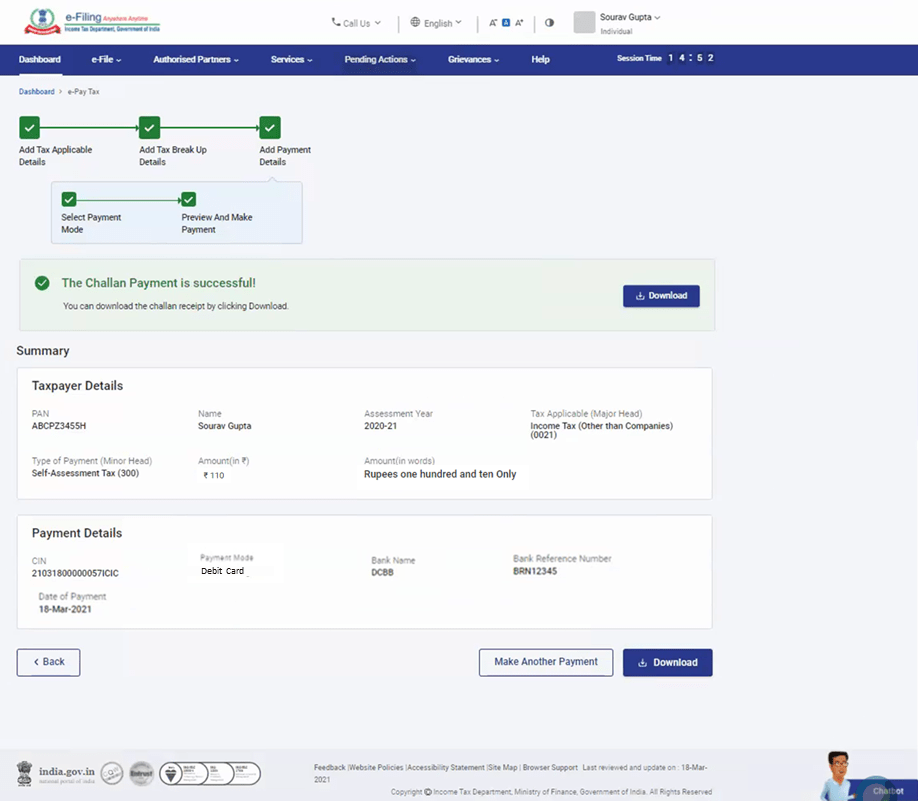 Step 8 (c): For payment through Pay at the Bank Counter
A. In the Pay at the Bank Counter menu, select the mode of payment (Cash / Cheque / Demand Draft).
Step 8 (c): For payment through Pay at the Bank Counter
A. In the Pay at the Bank Counter menu, select the mode of payment (Cash / Cheque / Demand Draft).
 Note:
(i) Payment above ₹10,000/- is not allowed through Cash.
(ii) This mode cannot be used by a taxpayer being a Company or a person (other than a company) to whom provisions of section 44AB of the Income-tax Act, 1961 are applicable as per Notification 34 / 2008 of CBDT.
B. On the Preview and Download Challan Form page, verify the payment details and tax break up details and click Continue.
Note:
(i) Payment above ₹10,000/- is not allowed through Cash.
(ii) This mode cannot be used by a taxpayer being a Company or a person (other than a company) to whom provisions of section 44AB of the Income-tax Act, 1961 are applicable as per Notification 34 / 2008 of CBDT.
B. On the Preview and Download Challan Form page, verify the payment details and tax break up details and click Continue.
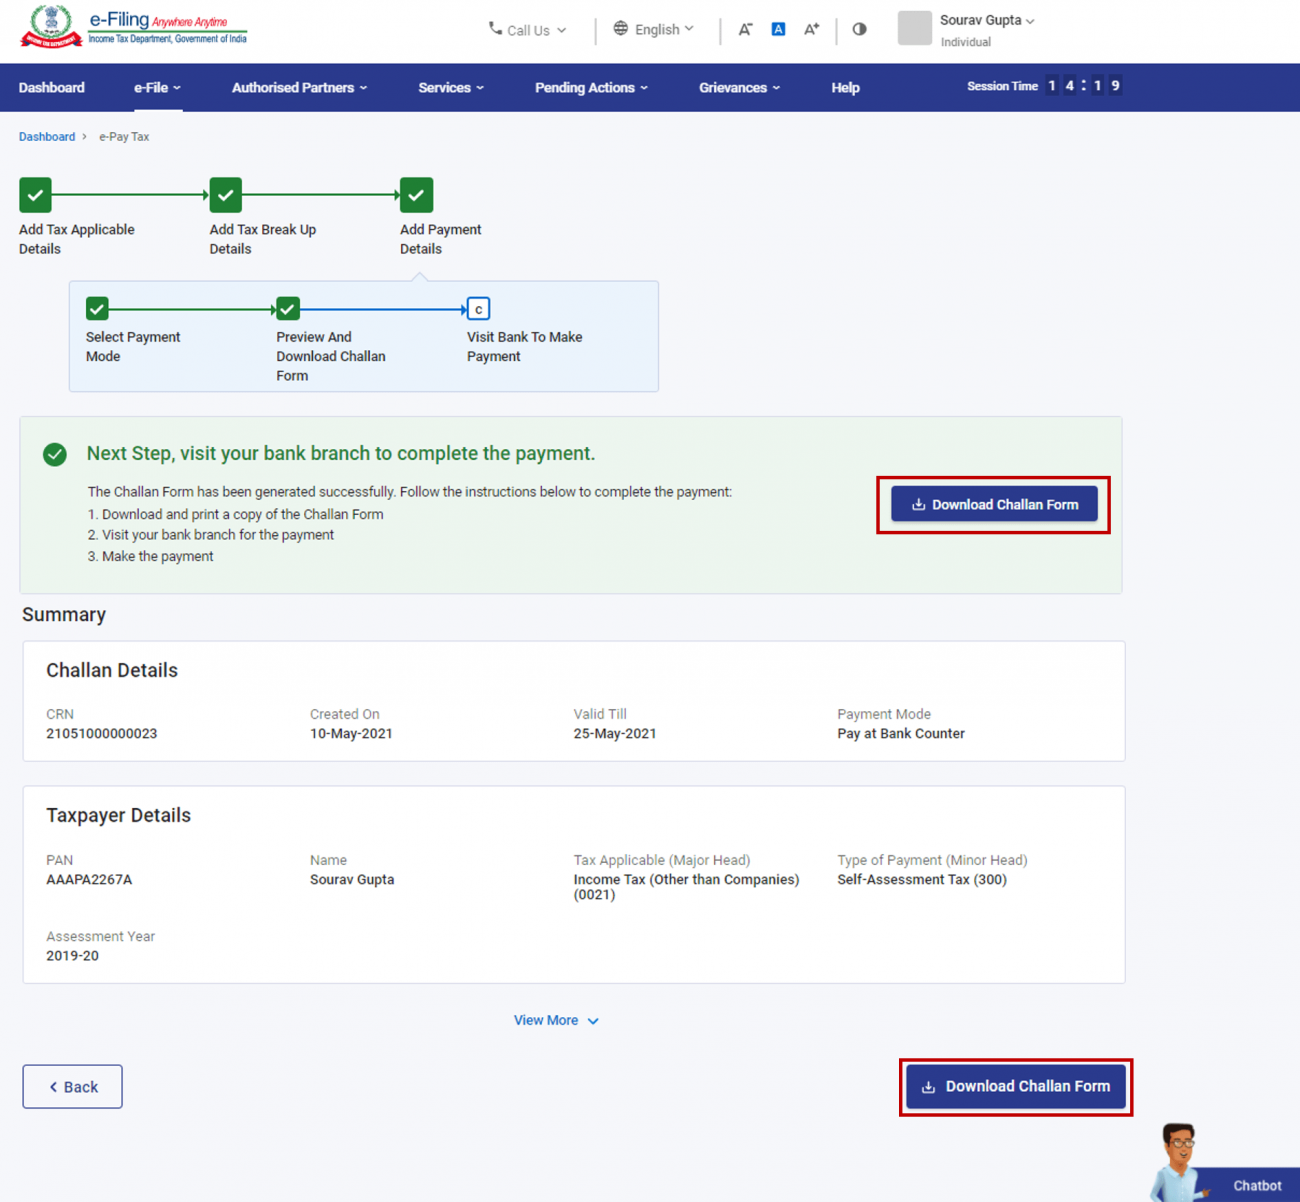
 C. On the Visit Bank to Make Payment page, the successfully generated Challan Form with Challan Reference Number (CRN) will be displayed. Download and print the Challan form and make the payment at the branch of the selected authorized bank.
 Step 8 (d): For payment through RTGS / NEFT (available for any bank providing this facility)
A. On selecting RTGS / NEFT as the mode of payment, click Continue.
Step 8 (d): For payment through RTGS / NEFT (available for any bank providing this facility)
A. On selecting RTGS / NEFT as the mode of payment, click Continue.
 B. On the Preview and Download Mandate Form page, verify the payment details and tax break up details and click Continue.
 C. On the Pay Now / Visit Bank to Make Payment page, the successfully generated Mandate Form with Challan Reference Number (CRN) will be displayed. After generation of CRN and Mandate Form, you can either visit the bank along with Mandate Form to complete the tax payment or Net Banking facility of the bank, where you have an account, can be availed to complete the transaction.
 Note:
(i) NEFT / RTGS payments can be made through any bank. You are advised to confirm the availability of NEFT / RTGS facility with bank.
(ii) NEFT / RTGS charges may be applicable as per RBI guidelines and Bank’s policy and the charges will be over and above the tax amount.
Step 8(e): For payment though Payment Gateway (using Debit Card / Credit Card / Net-banking / UPI)
A: In the Payment Gateway menu, select the Payment Gateway method and click Continue.
Note:
(i) NEFT / RTGS payments can be made through any bank. You are advised to confirm the availability of NEFT / RTGS facility with bank.
(ii) NEFT / RTGS charges may be applicable as per RBI guidelines and Bank’s policy and the charges will be over and above the tax amount.
Step 8(e): For payment though Payment Gateway (using Debit Card / Credit Card / Net-banking / UPI)
A: In the Payment Gateway menu, select the Payment Gateway method and click Continue.
 B: In the Preview and Make Payment page, verify the payment details and the tax breakup details, click Pay Now.
 C: Accept the Terms and Conditions and click Submit to Bank. (You will be redirected to the website of the selected payment gateway where you can log in or enter your debit / credit card / UPI details and make the payment).
 Note:
(i) The fees/service charges for making tax payments through Payment Gateway mode will be as per the Bank’s Terms and Conditions and in line with RBI Guidelines in this regard. It needs to be noted that e-Filing Portal / Income Tax Department does not charge any such fee. Such charge/fee will go to the bank / Payment Gateway and will be over and above the tax amount. However, as per the government’s guidelines, no such fees / MDR charges will be levied on payments made through Debit Card powered by RuPay, Unified Payments Interface (UPI) (BHIM-UPI), and Unified Payments Interface Quick Response Code (UPI QR Code) (BHIM-UPI QR Code).
(ii) No charge back claims against the Income Tax Department shall be allowable to any taxpayer under any circumstances. You are advised to make claim of such amount as tax credit during the filing of Income Tax return of the relevant Assessment Year. However, if allowed by the bank, you can raise such Charge Back Claim with the respective bank which may then process the claim as per applicable guidelines of RBI governing the chargeback claims.
D: After successful payment, a success message will be displayed. You can download the Challan Receipt for future references. You will be able to view the details of payment made in the Payment History menu on the e-Pay Tax page.
Note:
(i) The fees/service charges for making tax payments through Payment Gateway mode will be as per the Bank’s Terms and Conditions and in line with RBI Guidelines in this regard. It needs to be noted that e-Filing Portal / Income Tax Department does not charge any such fee. Such charge/fee will go to the bank / Payment Gateway and will be over and above the tax amount. However, as per the government’s guidelines, no such fees / MDR charges will be levied on payments made through Debit Card powered by RuPay, Unified Payments Interface (UPI) (BHIM-UPI), and Unified Payments Interface Quick Response Code (UPI QR Code) (BHIM-UPI QR Code).
(ii) No charge back claims against the Income Tax Department shall be allowable to any taxpayer under any circumstances. You are advised to make claim of such amount as tax credit during the filing of Income Tax return of the relevant Assessment Year. However, if allowed by the bank, you can raise such Charge Back Claim with the respective bank which may then process the claim as per applicable guidelines of RBI governing the chargeback claims.
D: After successful payment, a success message will be displayed. You can download the Challan Receipt for future references. You will be able to view the details of payment made in the Payment History menu on the e-Pay Tax page.

 Step 2: On the e-Pay Tax page, enter PAN / TAN and enter it again in the Confirm PAN / TAN textbox and enter mobile number (available with you). Click Continue.
 Step 3: On the OTP Verification page, enter the 6-digit OTP received on the mobile number entered in Step 2 and click Continue.
 Note:
(i) OTP will be valid for 15 minutes only.
(ii) You have 3 attempts to enter the correct OTP.
(iii) The OTP expiry countdown timer on screen tells you when the OTP will expire.
(iv) On clicking Resend OTP, a new OTP will be generated and sent.
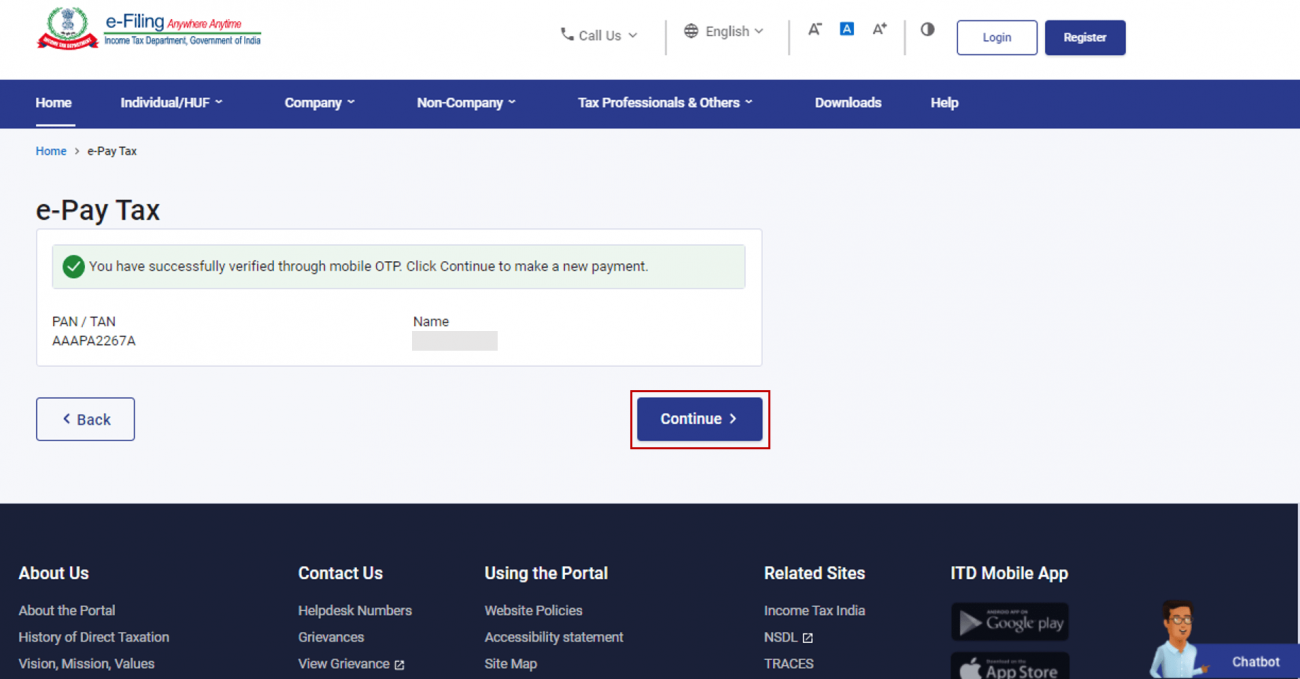
Step 4: After OTP verification, a success message with entered PAN / TAN and Name will be displayed. Click Continue to proceed.
Note:
(i) OTP will be valid for 15 minutes only.
(ii) You have 3 attempts to enter the correct OTP.
(iii) The OTP expiry countdown timer on screen tells you when the OTP will expire.
(iv) On clicking Resend OTP, a new OTP will be generated and sent.
Step 4: After OTP verification, a success message with entered PAN / TAN and Name will be displayed. Click Continue to proceed.
 Step 5: On the e-Pay Tax page, click Proceed on a tax payment category that applies to you.
 Depending on the category, you will be able select from the following Type of Payment:
 Step 6: Follow Step 5 to Step 8 as per section 3.1 Create Challan Form (CRN) (Post Login).
Note:
(i) You cannot save draft of the Challan Form (CRN) while entering your details using pre-login service.
(ii) The details entered will only be available till the time the page is active.
(iii) If you wish to save a draft, you need to Create Challan Form (CRN) post-login. Refer to Section 3.1. Create Challan (Post Login) to learn more.
Step 6: Follow Step 5 to Step 8 as per section 3.1 Create Challan Form (CRN) (Post Login).
Note:
(i) You cannot save draft of the Challan Form (CRN) while entering your details using pre-login service.
(ii) The details entered will only be available till the time the page is active.
(iii) If you wish to save a draft, you need to Create Challan Form (CRN) post-login. Refer to Section 3.1. Create Challan (Post Login) to learn more.
 Step 2: On your Dashboard, click e-File > e-Pay Tax. You will be taken to the e-Pay Tax page. Select PAN / TAN of the taxpayer on behalf of whom you want to create a challan form (CRN) and click Continue.
Step 3: After entering PAN / TAN, follow Step 3 to Step 8 as per section 3.1. Create Challan Form (CRN) (Post Login) of Create Challan Form (CRN) user manual.
Note:
(i) Type 1 ERIs will be able to make payments online as well as offline.
(ii) Type 2 ERIs will be able to make payments offline only.
Step 2: On your Dashboard, click e-File > e-Pay Tax. You will be taken to the e-Pay Tax page. Select PAN / TAN of the taxpayer on behalf of whom you want to create a challan form (CRN) and click Continue.
Step 3: After entering PAN / TAN, follow Step 3 to Step 8 as per section 3.1. Create Challan Form (CRN) (Post Login) of Create Challan Form (CRN) user manual.
Note:
(i) Type 1 ERIs will be able to make payments online as well as offline.
(ii) Type 2 ERIs will be able to make payments offline only.
 Step 2: After logging in, enter the PAN of the assessee whom you are representing.
Step 3: On the Dashboard of the selected assessee, click e-File > e-Pay Tax. You will be taken to the e-Pay Tax page. On the e-Pay Tax page, you can view details of Saved Drafts, Generated Challans and Payment History.
Step 2: After logging in, enter the PAN of the assessee whom you are representing.
Step 3: On the Dashboard of the selected assessee, click e-File > e-Pay Tax. You will be taken to the e-Pay Tax page. On the e-Pay Tax page, you can view details of Saved Drafts, Generated Challans and Payment History.
 Step 4: Follow Step 3 to Step 8 as per section 3.1. Create Challan Form (CRN) (Post Login) of Create Challan Form (CRN) user manual.
Prerequisites for availing this service
You can generate Challan Form (CRN) via pre-login (before logging into e-Filing portal) or post-login (after logging into e-Filing portal) facility. (i) Valid and active PAN/TAN (pre-login). (ii) Registered user on the e-Filing portal with valid user ID and password (post-login).Step-by-Step Guide
(i) Generate Challan Form (CRN) (Post Login) (ii) Generate Challan Form (CRN) (Pre Login) (iii) Generate Challan Form (CRN) (Post Login, Type-1 and Type-2 ERI) (iv) Generate Challan Form (CRN) (Post Login for Representative Assessee)1. Generate Challan Form (CRN) (Post Login)
Step 1: Log in to the e-Filing portal with user ID and password.
Step 2: On the Dashboard, click e-File > e-Pay Tax. On the e-Pay Tax page, you can view details of Saved Drafts, Generated Challans and Payment History.
Step 3: On the e-Pay Tax page, click the New Payment option to create a new Challan Form (CRN).
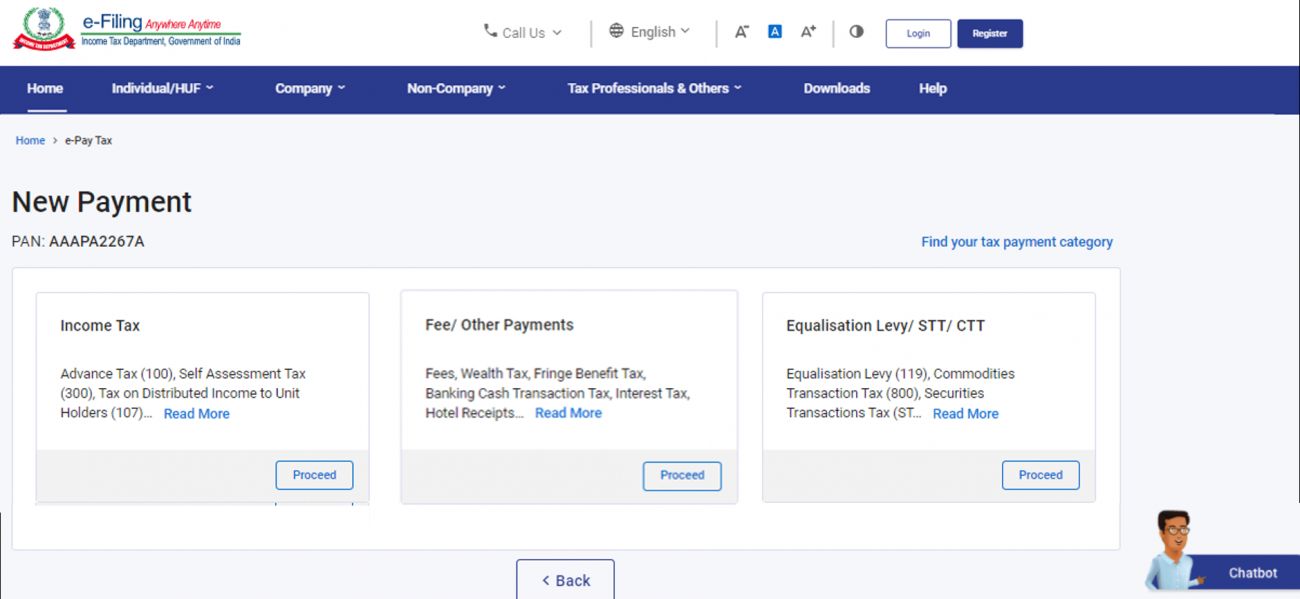
Step 4: On the New Payment page, click Proceed on a tax payment tile that applies to you.
Note: In case you are not sure of the category, you can find the applicable category by clicking on the Find your tax payment category tab.
Depending on the category, you will be able select from the following Type of Payment:
Step 5: After selecting the applicable Tax Payment tile, enter the details as per the table below and click Continue.
Step 6: On the Add Tax Breakup Details page, add the breakup of total amount of tax payment and click Continue.
Note: The total of break-up has to be a NON-ZERO amount.
Step 7: You will be required to select the payment mode though which payment is proposed to be made. Five modes of payments are available, as explained below.
Note: Once a payment mode is chosen for a Challan Form and Challan Reference Number (CRN) is generated for it, the payment mode cannot be changed later during payment.
Step 8 (a): For payment through Net Banking (of authorized banks)
A. On the Select Payment Mode page, select the Net Banking menu and select the Bank Name from the options. (If your bank name is not displayed as one of the radio options, select it from the dropdown menu of Other Bank) & click Continue.
Note: This facility is available for Authorized Banks only. If your bank is not authorized bank, RTGS / NEFT or Payment Gateway mode can be selected for tax payment.
B. On the Preview and Make Payment page, verify the payment details and tax break up details and click Pay Now.
C. Read and accept the Terms and Conditions and click Submit to Bank. (You will be redirected to the website of the selected Bank where you can log in and make the payment.)
After successful payment, a success message will be displayed. You can download the Challan Receipt for future reference. You will be able to view the details of payment made in the Payment History menu on the e-Pay Tax page.
Step 8 (b): For payment through Debit Card (of Authorized Bank)
A: In the Debit Card menu, select the Bank Name from the options and click Continue.
B: On the Preview and Make Payment page, verify the payment details and tax break up details and click Pay Now.
C: Read and select the Terms and Conditions and click Submit to Bank. (You will be redirected to the website of your selected Bank where he can enter his debit card details and make the payment.)
After successful payment, a success message will be displayed. You can download the Challan Receipt for future references. You will be able to view the details of payment made in the Payment History menu on the e-Pay Tax page.
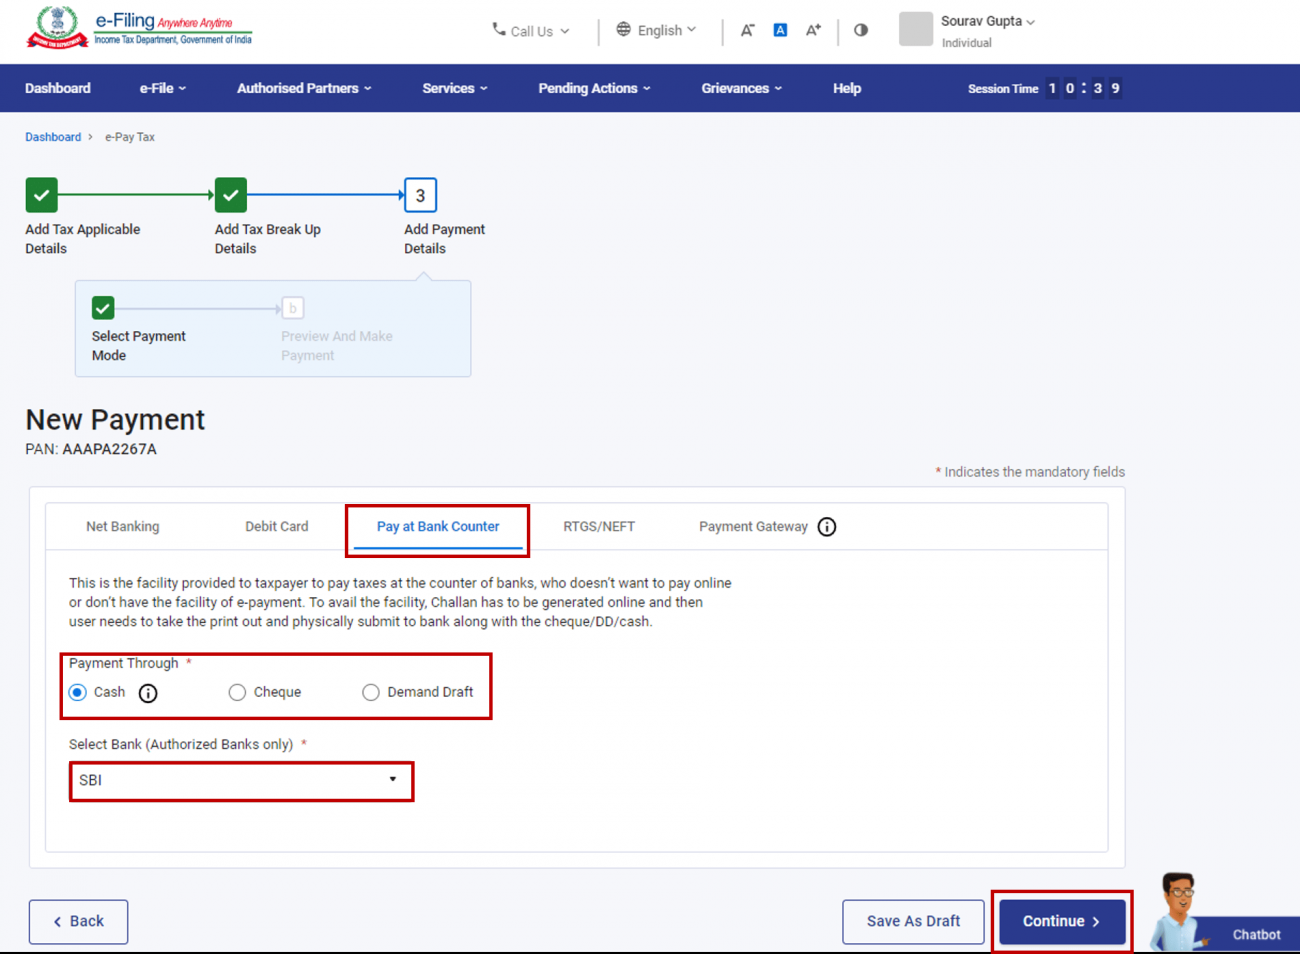
Step 8 (c): For payment through Pay at the Bank Counter
A. In the Pay at the Bank Counter menu, select the mode of payment (Cash / Cheque / Demand Draft).
Note:
(i) Payment above ₹10,000/- is not allowed through Cash.
(ii) This mode cannot be used by a taxpayer being a Company or a person (other than a company) to whom provisions of section 44AB of the Income-tax Act, 1961 are applicable as per Notification 34 / 2008 of CBDT.
B. On the Preview and Download Challan Form page, verify the payment details and tax break up details and click Continue.
C. On the Visit Bank to Make Payment page, the successfully generated Challan Form with Challan Reference Number (CRN) will be displayed. Download and print the Challan form and make the payment at the branch of the selected authorized bank.
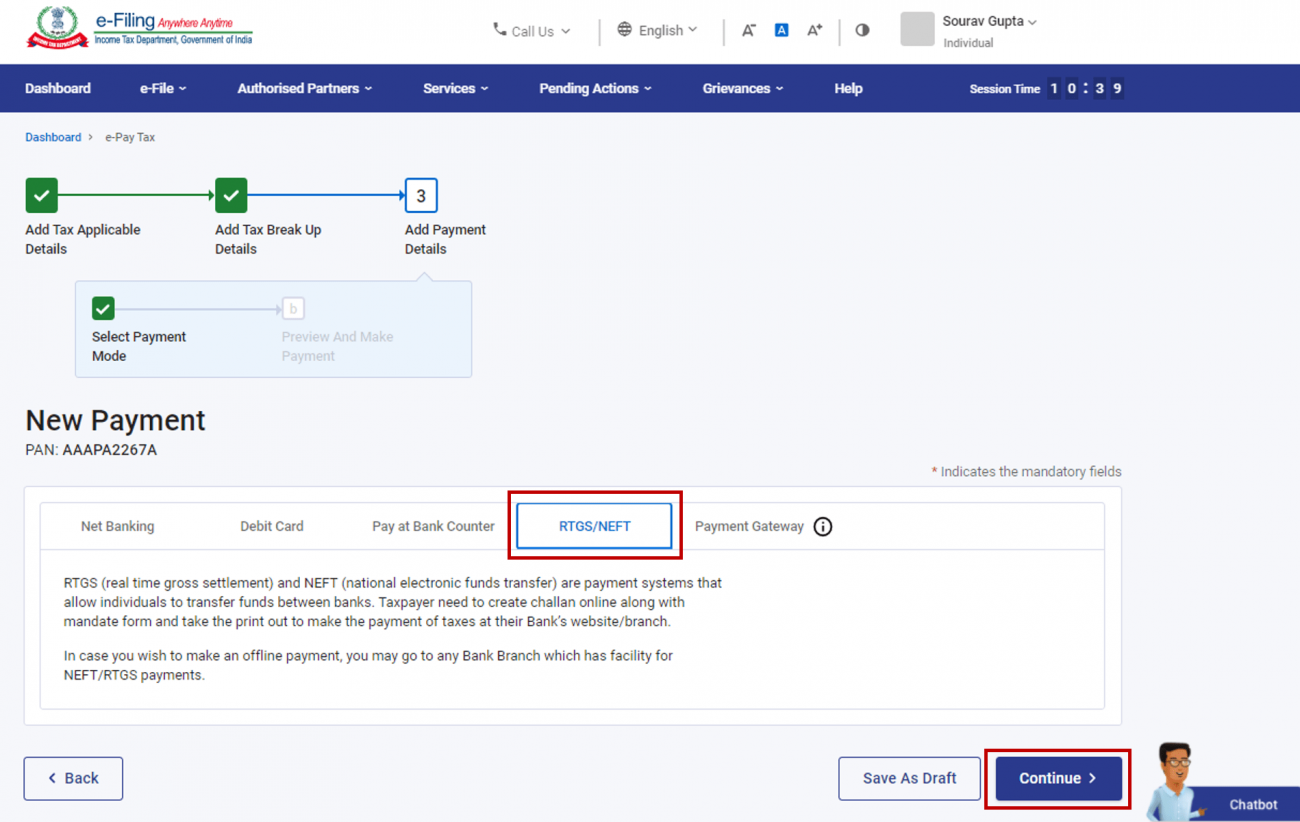
Step 8 (d): For payment through RTGS / NEFT (available for any bank providing this facility)
A. On selecting RTGS / NEFT as the mode of payment, click Continue.
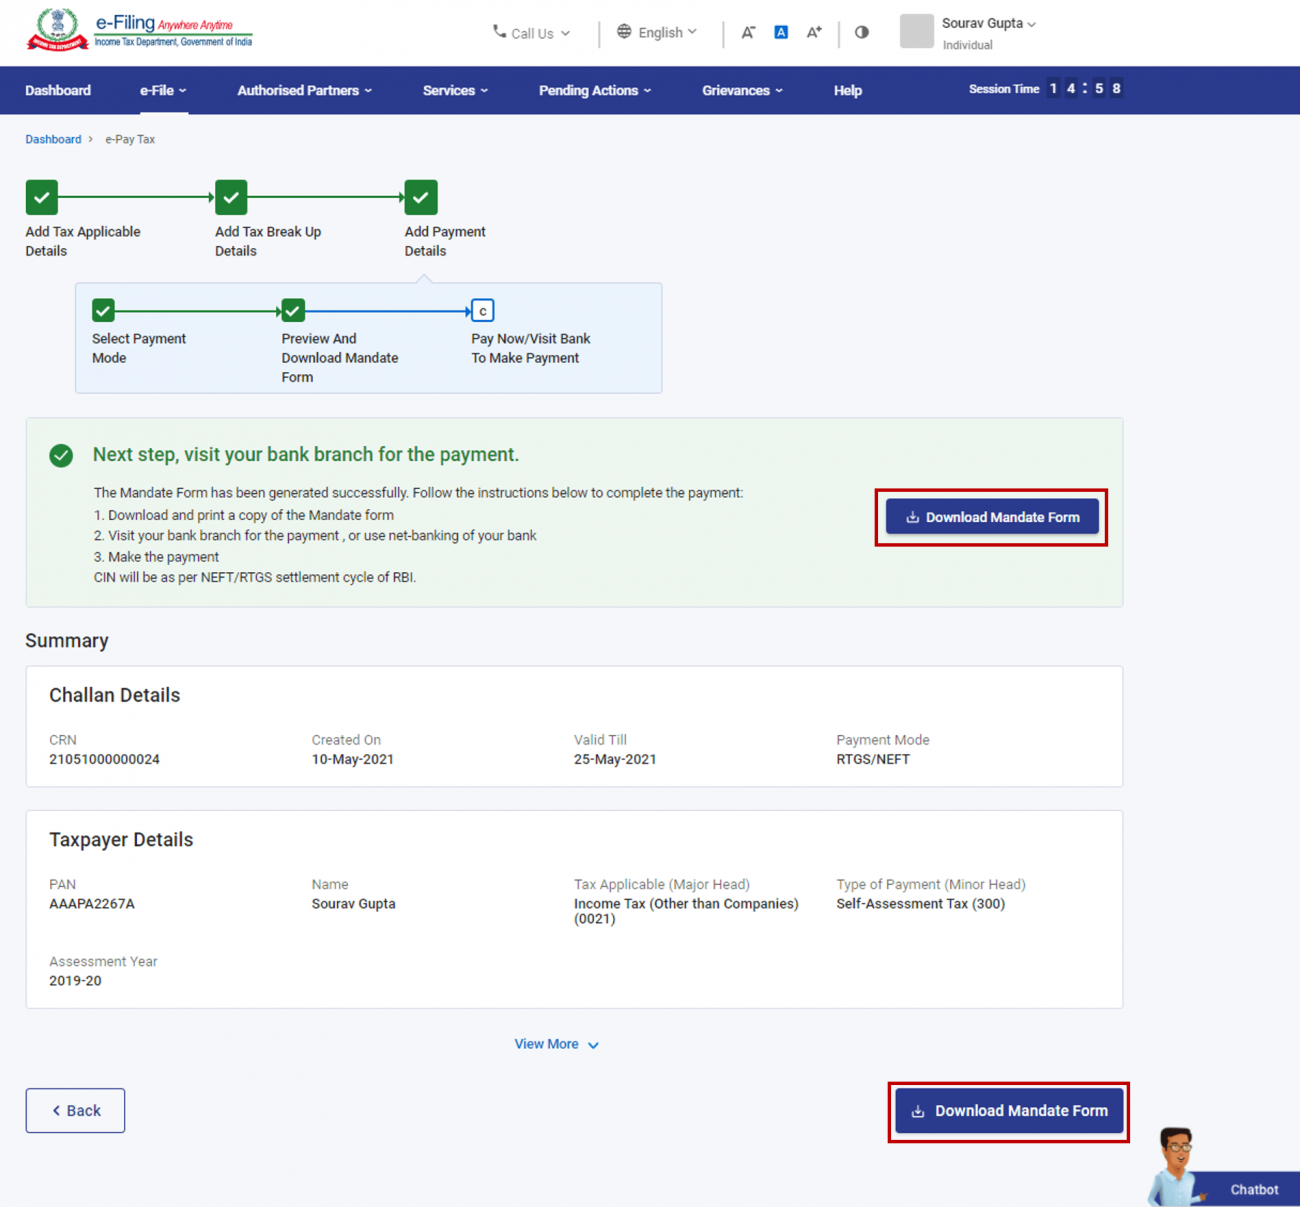
B. On the Preview and Download Mandate Form page, verify the payment details and tax break up details and click Continue.
C. On the Pay Now / Visit Bank to Make Payment page, the successfully generated Mandate Form with Challan Reference Number (CRN) will be displayed. After generation of CRN and Mandate Form, you can either visit the bank along with Mandate Form to complete the tax payment or Net Banking facility of the bank, where you have an account, can be availed to complete the transaction.
Note:
(i) NEFT / RTGS payments can be made through any bank. You are advised to confirm the availability of NEFT / RTGS facility with bank.
(ii) NEFT / RTGS charges may be applicable as per RBI guidelines and Bank’s policy and the charges will be over and above the tax amount.
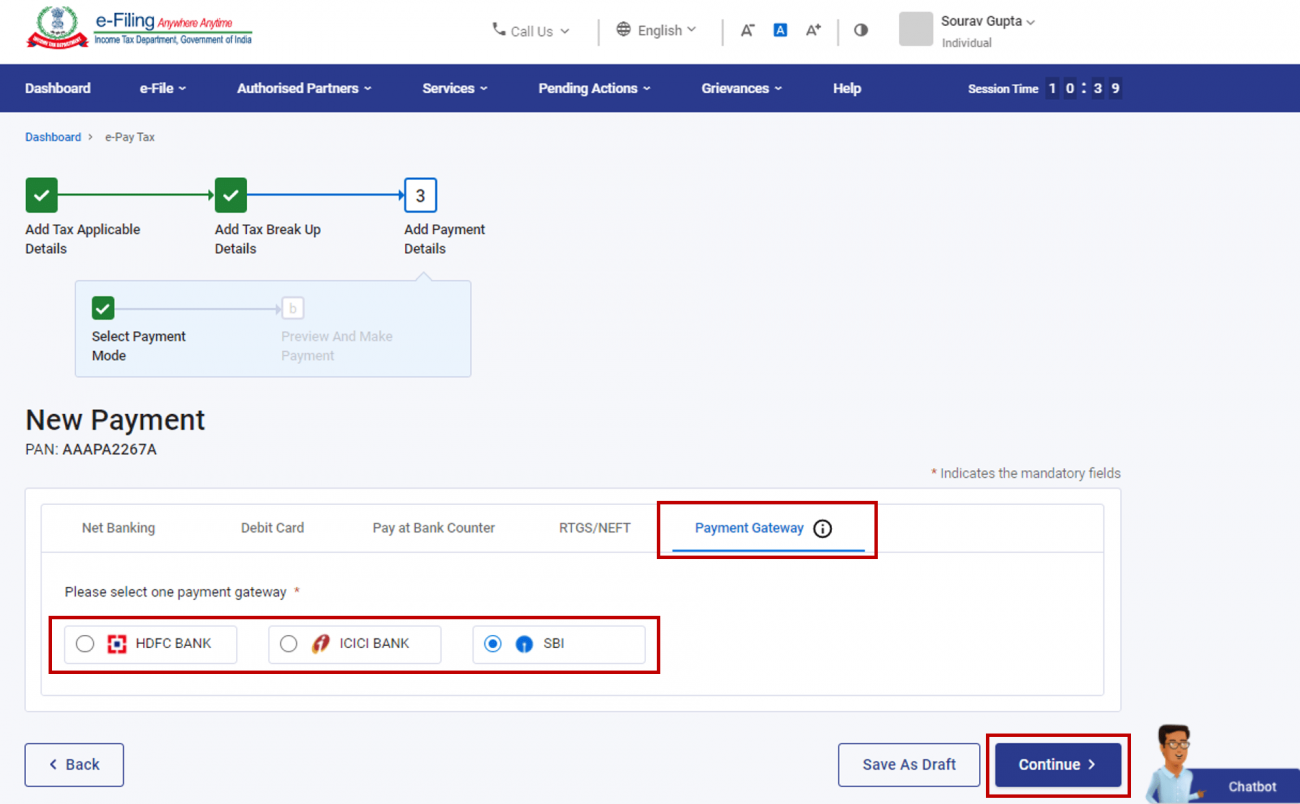
Step 8(e): For payment though Payment Gateway (using Debit Card / Credit Card / Net-banking / UPI)
A: In the Payment Gateway menu, select the Payment Gateway method and click Continue.
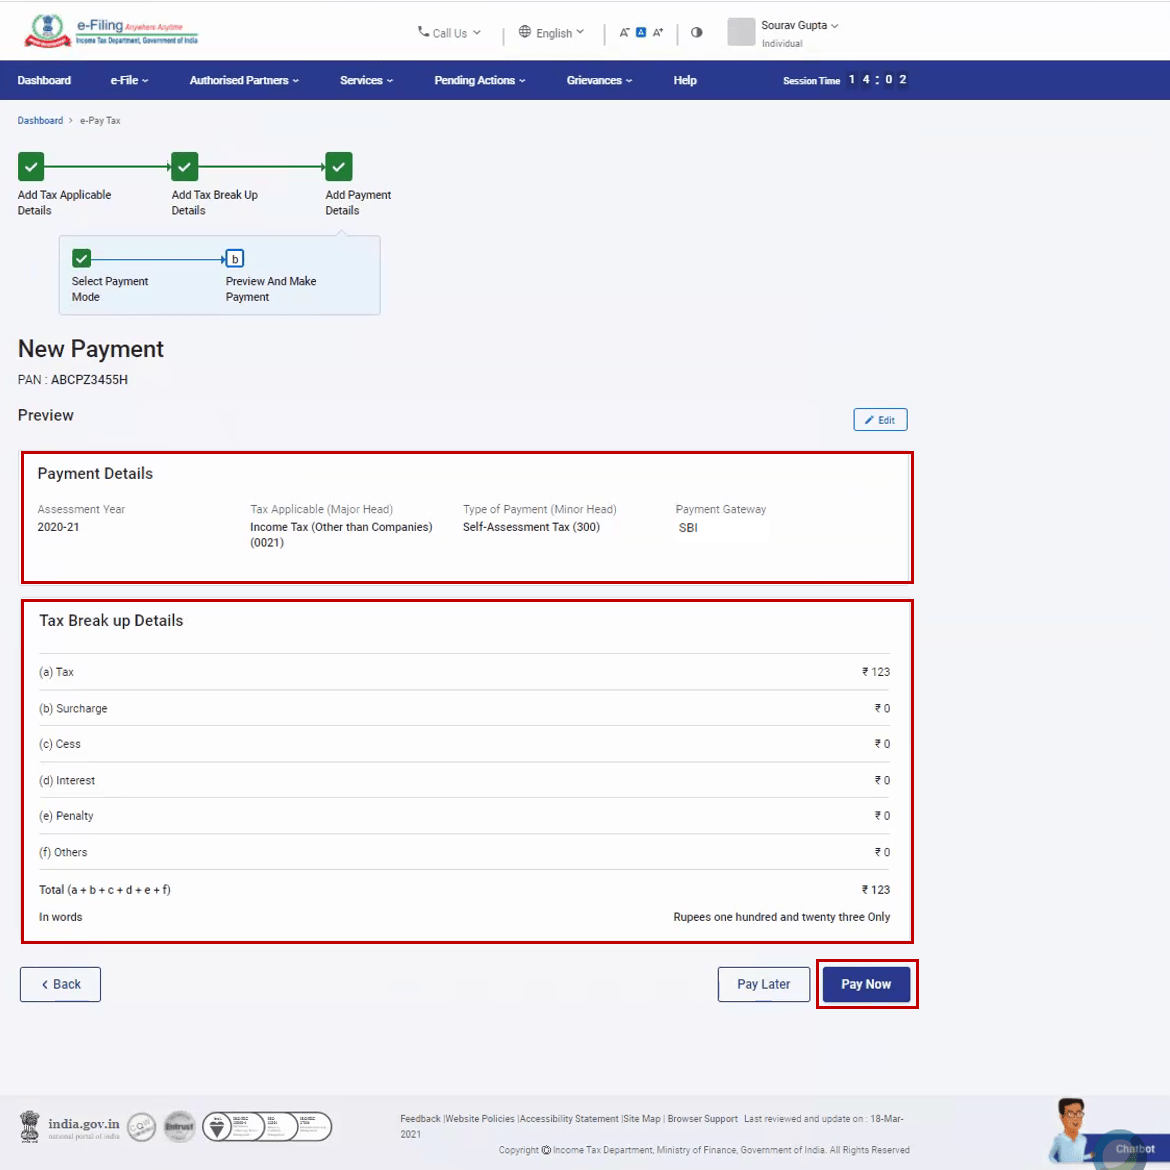
B: In the Preview and Make Payment page, verify the payment details and the tax breakup details, click Pay Now.
C: Accept the Terms and Conditions and click Submit to Bank. (You will be redirected to the website of the selected payment gateway where you can log in or enter your debit / credit card / UPI details and make the payment).
Note:
(i) The fees/service charges for making tax payments through Payment Gateway mode will be as per the Bank’s Terms and Conditions and in line with RBI Guidelines in this regard. It needs to be noted that e-Filing Portal / Income Tax Department does not charge any such fee. Such charge/fee will go to the bank / Payment Gateway and will be over and above the tax amount. However, as per the government’s guidelines, no such fees / MDR charges will be levied on payments made through Debit Card powered by RuPay, Unified Payments Interface (UPI) (BHIM-UPI), and Unified Payments Interface Quick Response Code (UPI QR Code) (BHIM-UPI QR Code).
(ii) No charge back claims against the Income Tax Department shall be allowable to any taxpayer under any circumstances. You are advised to make claim of such amount as tax credit during the filing of Income Tax return of the relevant Assessment Year. However, if allowed by the bank, you can raise such Charge Back Claim with the respective bank which may then process the claim as per applicable guidelines of RBI governing the chargeback claims.
D: After successful payment, a success message will be displayed. You can download the Challan Receipt for future references. You will be able to view the details of payment made in the Payment History menu on the e-Pay Tax page.
3.2. Create Challan Form (CRN) (Pre-Login)
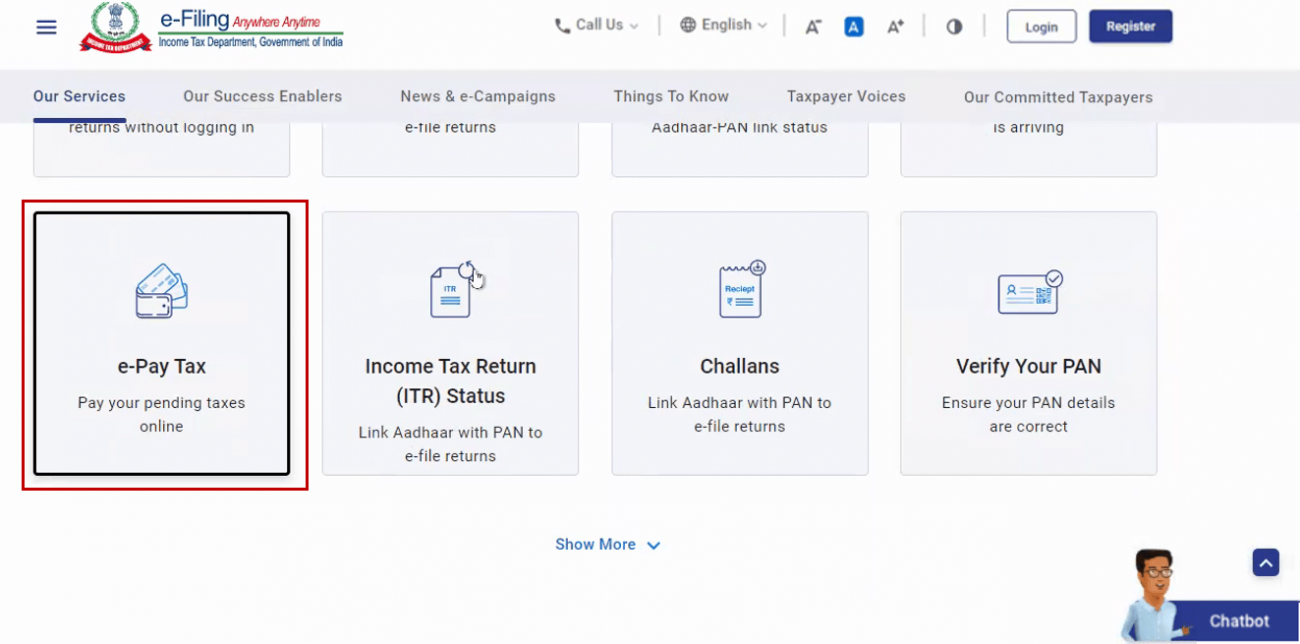
Step 1: Go to the e-Filing portal homepage and click e-Pay Tax.
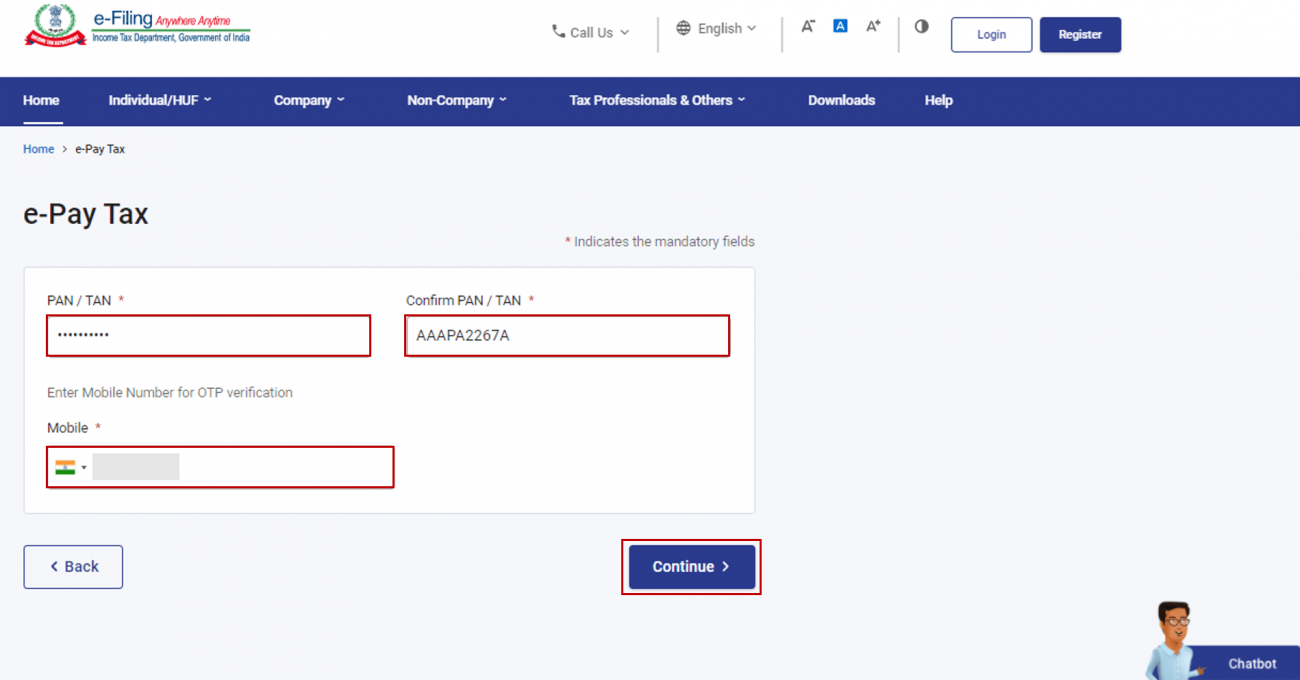
Step 2: On the e-Pay Tax page, enter PAN / TAN and enter it again in the Confirm PAN / TAN textbox and enter mobile number (available with you). Click Continue.
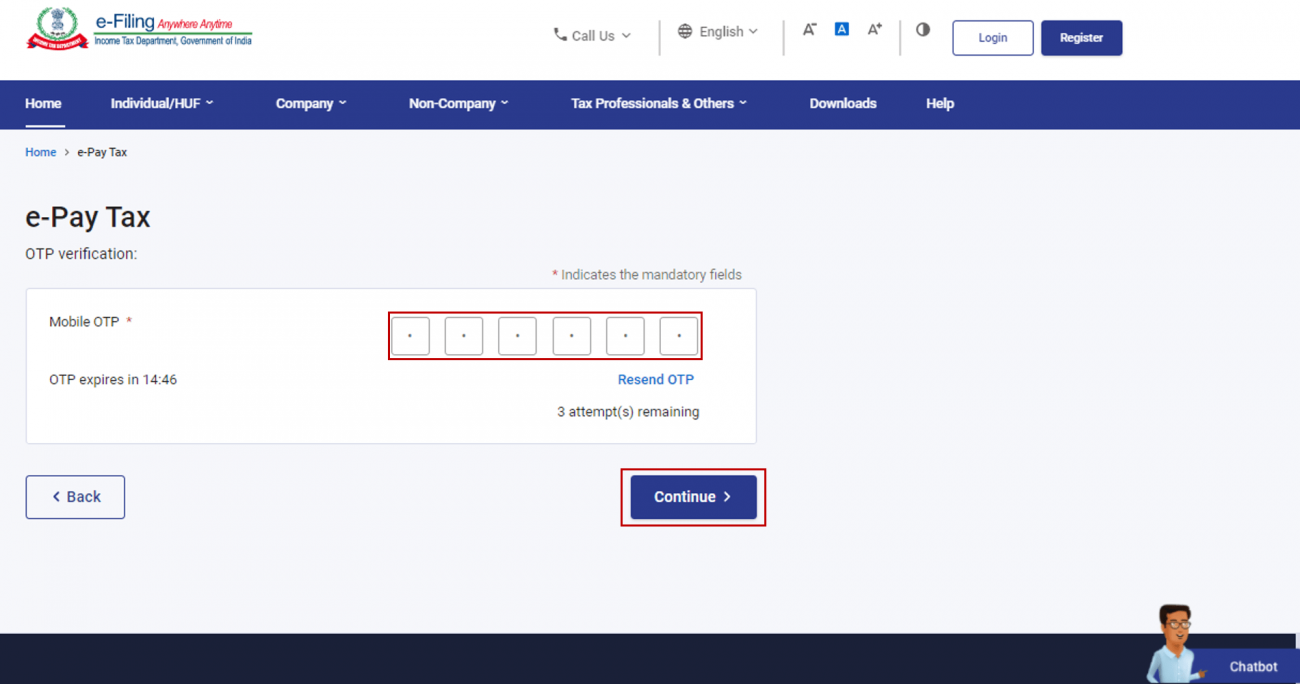
Step 3: On the OTP Verification page, enter the 6-digit OTP received on the mobile number entered in Step 2 and click Continue.
Note:
(i) OTP will be valid for 15 minutes only.
(ii) You have 3 attempts to enter the correct OTP.
(iii) The OTP expiry countdown timer on screen tells you when the OTP will expire.
(iv) On clicking Resend OTP, a new OTP will be generated and sent.
Step 4: After OTP verification, a success message with entered PAN / TAN and Name will be displayed. Click Continue to proceed.
Step 5: On the e-Pay Tax page, click Proceed on a tax payment category that applies to you.
Depending on the category, you will be able select from the following Type of Payment:
Step 6: Follow Step 5 to Step 8 as per section 3.1 Create Challan Form (CRN) (Post Login).
Note:
(i) You cannot save draft of the Challan Form (CRN) while entering your details using pre-login service.
(ii) The details entered will only be available till the time the page is active.
(iii) If you wish to save a draft, you need to Create Challan Form (CRN) post-login. Refer to Section 3.1. Create Challan (Post Login) to learn more.
3.3 Create Challan Form (CRN) (Post Login, Type-1 and Type-2 ERI)
Step 1: Log in to the e-Filing portal with your user ID and password.
Step 2: On your Dashboard, click e-File > e-Pay Tax. You will be taken to the e-Pay Tax page. Select PAN / TAN of the taxpayer on behalf of whom you want to create a challan form (CRN) and click Continue.
Step 3: After entering PAN / TAN, follow Step 3 to Step 8 as per section 3.1. Create Challan Form (CRN) (Post Login) of Create Challan Form (CRN) user manual.
Note:
(i) Type 1 ERIs will be able to make payments online as well as offline.
(ii) Type 2 ERIs will be able to make payments offline only.
3.4. Create Challan Form (CRN) (Post Login, Representative Assessee)
Step 1: Log in to the e-Filing portal with your user ID and password.
Step 2: After logging in, enter the PAN of the assessee whom you are representing.
Step 3: On the Dashboard of the selected assessee, click e-File > e-Pay Tax. You will be taken to the e-Pay Tax page. On the e-Pay Tax page, you can view details of Saved Drafts, Generated Challans and Payment History.
Step 4: Follow Step 3 to Step 8 as per section 3.1. Create Challan Form (CRN) (Post Login) of Create Challan Form (CRN) user manual.About Author

Reetu
Content Manager
Reetu is a Content Writer with 4+ years of experience in GST, Income Tax, Finance, Company Law, Education and Career Related Content. She is a B.COM (Honrs.) Graduate.
 Studycafe
 Delhi, Delhi, India
 8072
8072My Recent Articles
- Income Tax Guide for Indian Defence Personnel for Tax Filing, Taxable Allowances and Other Benefits
- Income Tax Return Breaking: ITR Forms released for AY 25-26
- Ex-DRT Officials Sentenced to 5 Years Rigorous Imprisonment by Madras High Court along with Rs.27 Lakh Fine
- GSTN issued Advisory on Case Sensitivity in IRN Generation
- RBI to issue Notes of Rs.10 and Rs.500 bearing Signature of Guv Malhotra
Up Next
Loading suggestions…


Recent Posts


All Posts


Tags
Recent Posts
All Posts