Tally ERP 9 Easy Learning Notes
Tally ERP 9 Easy Learning Notes To Start Tally ERP 9:- Start >Programs >Tally ERP 9 >Tally ERP-9 Click Or Double click on the Tally
Tally ERP 9 Easy Learning Notes
To Start Tally ERP 9:-
Start >Programs >Tally ERP 9 >Tally ERP-9 Click
Or
Double click on the Tally ERP 9 icon on your Desktop
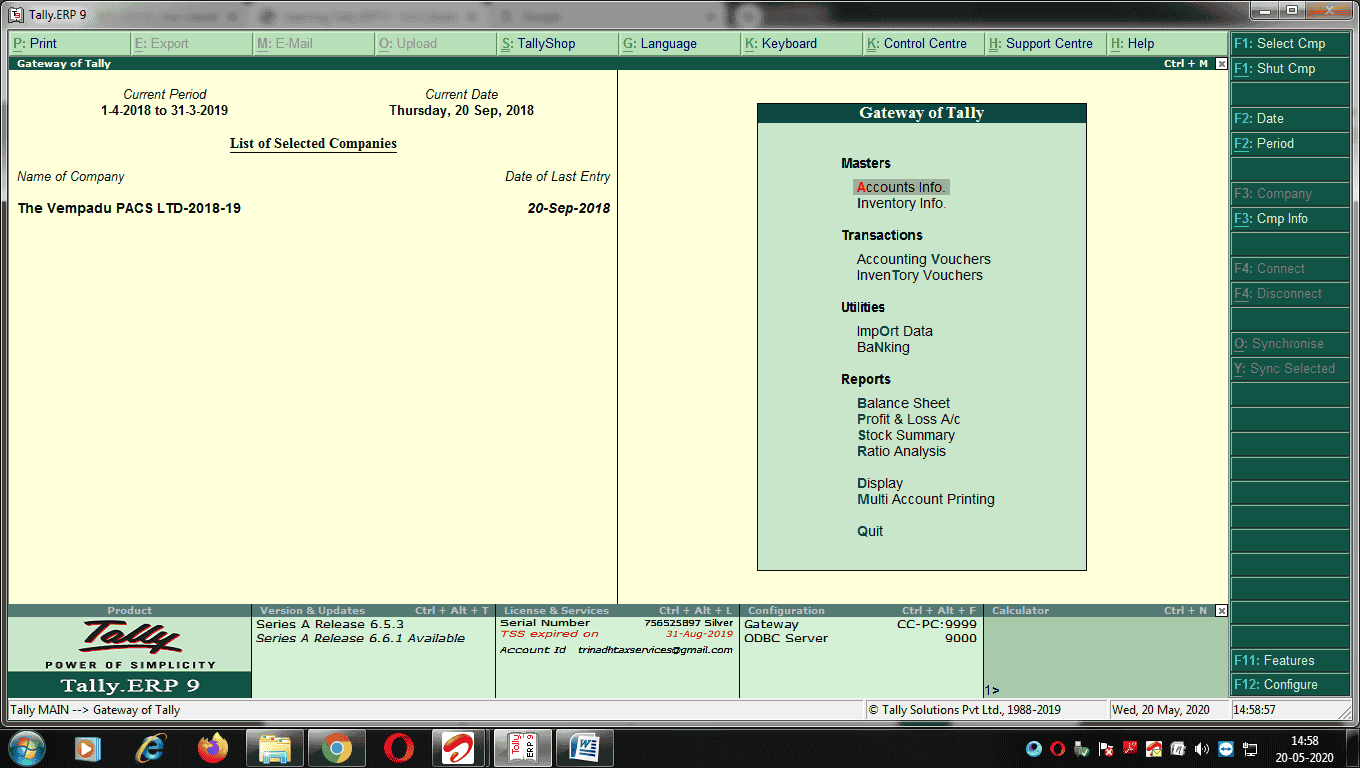
[caption id="attachment_88989" align="aligncenter" width="1360"] Tally ERP 9 Easy Learning Notes[/caption]
Tally ERP 9 Easy Learning Notes[/caption]
Above Screen Components
Title Bar, Harizontal Button bar, Close button,Gateway of Tally,Buttons toolbar, CalculatorArea, Info panel. Imp:- While Working with TallyERP 9, use the following conventions: Mouse /Keyboard Conventions| Action | Particulars |
| Click | Press the left mouse button. |
| Double-click | Press and release the left mouse button twice, without moving the mouse pointer off the item |
| Choose | Position the mouse pointer on the item and click the left mouse button |
| Select | Position the mouse pointer on the item and doubleclick the left mouse button. |
| Press | Use the keys on the keyboard in the combination shown |
| Fn | Press the function key. |
| Fn | Press ALT + function key |
| Fn | Press CTRL + function key |
Switching between Screen Areas:
When Tally.ERP 9 first loads, the Gateway of Tally screen displays. To toggle between this screen and the Calculator/ ODBC server area at the bottom of the screen, press Ctrl+N or Ctrl+M as indicated on the screen. A green bar highlights the active area of the screen.Quitting Tally.ERP 9 :-
You can exit the program from any Tally.ERP 9 screen, but Tally.ERP 9 requires all screens to be closed before it shuts down Following ways to quit working on Tally.ERP 9 1. Press Esc until you see the message Quit? Yes or No ? Press Enter or Y, or click Yes to quit Tally.ERP 9. 2. Alternatively, to exit without confirmation, press Ctrl+Q from Gateway of Tally. 3. You can also press Enter while the option Quit is selected from Gateway of Tally.1). Creation of a Company:-
Go to Gateway of Tally > Company Info. > Create Company Or from the buttons bar select by using mouse Company Info. Or Alt +F3 to bring up the Company Info MenuTo Select a Company:-
Go to the Gateway of Tally > Alt + F3 > Company Info. > Select Company OR Press F1.To Alter Company Details :-
Go to the Gateway of Tally > Alt + F3 > Company Info. >AlterTo Shut a Company :-
Go to the Gateway of Tally > Alt + F3 > Company Info. > Shut Company Or Alt +F12). F11: Features:-
Features are divided in to Four Major Categories –- Accounting Features
- Inventory Features
- Statutory & Taxation
- Tally. NET Features
Accounting Features :-
Go to Gateway of Tally > F11: Features > Accounting Features or click on F1: AccountsInventory Features:-
Go to Gateway of Tally > F11: Features > Inventory Features or click on F2 : InventoryStatutory & Taxation:-
Go to Gateway of Tally > F11: Features > Statutory & Taxation or click on F3 : StatutoryTally.NET Features:-
Go to Gateway of Tally > F11: Features > Tally.NET Features or click on F4 : Tally.NET3). F12: Configurations:-
In Tally.ERP 9, the F12: Configurations are provided for Accounting, Inventory & printing options and are user-definable as per your requirements. The F12: Configuration options vary depending upon the menu display. i.e., if you press F12: configure from Voucher entry screen, the respective F12: Configurations screen is displayed. Go to Gateway of Tally > press F12: Configure4). In Master Creation:-
Group and Ledger Creation Group Creation:– Go to the Gateway of Tally > Accounts Info. > Groups > Create Or A +G+C from Gateway of Tally Group Alter :- Go to the Gateway of Tally > Accounts Info. > Groups > Alter Or A +G+A from Gateway of Tally Group Display:- Go to the Gateway of Tally > Accounts Info. > Groups > Display Or A+G+D of Gateway of Tally You can create Multiple Group:- Go to the Gateway of Tally > Accounts Info. > Groups > CReate Or A+G+R from Gateway of Tally To Alter Multiple Group:- Go to the Gateway of Tally > Accounts Info. > Groups > AlTer Or A+G+T from Gateway of Tally To Display Multiple Group:- Go to the Gateway of Tally > Accounts Info. > Groups > DIsplayHow to create Ledgers:-
Ledger Creation:– Go to the Gateway of Tally > Accounts Info. > Ledger> Create Or A +L+C from Gateway of Tally Ledger Alter :- Go to the Gateway of Tally > Accounts Info. > Ledger > Alter Or A +L+A from Gateway of Tally Ledger Display:- Go to the Gateway of Tally > Accounts Info. > Ledger > Display Or A+L+D of Gateway of Tally You can create Multiple Ledgers:- Go to the Gateway of Tally > Accounts Info. > Ledger> CReate Or A+L+R from Gateway of Tally To Alter Multiple Ledger:- Go to the Gateway of Tally > Accounts Info. > Ledger > AlTer Or A+L+T from Gateway of Tally To Display Multiple Ledger:- Go to the Gateway of Tally > Accounts Info. > Ledger > DIsplay Or A+L+I from Gateway of Tally5). Creating Inventory Masters in Tally .ERP 9:-
Go to Gateway of Tally - Inventory Info. Creation of Stock Group :- Gateway of Tally > Inventory Info. > Stock Groups > Create Or I+G+C from Gateway of Tally Alter of Stock Group:- Gateway of Tally > Inventory Info. > Stock Groups > Alter Or I+G+A from Gateway of Tally Creating Units of Measure:- Gateway of Tally > Inventory Info. > Units of Measure > Create Or I+U+C from Gateway of Tally Creating Stock Item:- Gateway of Tally > Inventory Info. > Stock Items > Create Or I+I+C from Gateway of Tally Creating Stock Categories:- First change F11 Features -(F2 inventory features)-Maintain Stock Categories-set –Yes to get additional option Stock categories under InventryInfo. Gateway of Tally > Inventory Info. > Stock Categories > Create or I+C+C from Gateway of Tally Creating Godowns:- First change F11 Features -(F2 inventory features)-Maintain Multiple Godowns-set –Yes to get additional option Godown under Inventry Info. Gateway of Tally > Inventory Info. > Godown > Create or I+D+C from Gateway of Tally6). Voucher Entry in Tally ERP 9 :-
Accounting Vouchers:- Tally .ERP9 is Pre-Programmed variety of accounting Vouchers, each designed to perform a different Job. The Standard Accounting Vouchers are –- Contra Voucher (F4):- Contra Voucher is use specific for Cash Deposit at Bank & Cash Withdrawal
- Gateway of Tally > Accounting Vouchers> F4:Contra
- Payment Voucher (F5):- All payment entry in Payment Voucher
- Receipt Voucher (F6):- All Receipt entry maid in Receipt Voucher
- Journal Voucher(F7) :- All Journal Voucher used for other than cash/bank and Purchase of Goods & Sales of Goods
- Sales Voucher /Invoice (F8) :- The Sales Voucher used all cash bank Sales
- Credit Note Voucher (Ctrl+F8):- All Sales Return transactions here entered.
- Purchase Voucher (F9):- Cash or Credit Purchase entry made here.
- Debit Note Voucher (Ctrl+F9) : All Purchase Return transactions here entered.
- Reversing Journals (F10):-Reversing Journals are special Journals that are automatically reversed after a specified date. Gateway of Tally +F11 >F1: Accounting Feature –Use Reversing Journal & Optional Vouchers –Yes.
- Memo voucher (CTRL+ F10):- Memorandum Vouchers is a non-accounting voucher and the entries made using the memo voucher will not affect your accounts. In other words, Tally does not post these entries to ledgers but stores them in a separate Memorandum Register.
-
You can use the Memorandum Vouchers for:
- Payments towards suspense accounts - consider a company gives its employee cash for Conveyance expenses, the exact nature and cost of which are unknown. For such transactions, you can enter a voucher for the petty cash advance. A voucher to record the actual expenditure details when they are known, and another voucher to record the return of surplus cash. However, a simpler way of doing it is to enter a Memo voucher when the cash is advanced, and then turn it into a Payment voucher for the actual amount spent, when the actual details are known.
- Vouchers not verified at the time of entry - if you do not understand the details of a voucher you are entering, you can enter it as a Memo voucher and amend it later when the details are available.
- Items given on approval - Generally completed sales are entered into books. In case items are given on approval, use a Memo voucher to track and convert it into a proper Sales voucher. You can delete the memo voucher if the sale is not made.
-
7). Trade Discounts:-
If we want a separate column for discount in Invoices :-- To activate Separate Discount Column in Invoice-
- Gate Way of Tally-Press F11-Features-F2 for Inventory Features-
- Activate -Separate Discount Column in Invoice Set as –Yes
- When there is difference between Quantities purchase/sold and delivered,we have to specify quantities, at the time of invoicing.
- Example. We have delivered 4 T-Sharts out of which 1 T-Shirt free.then we will issue a bill for 3-T-Shirts.
- Gate Way of Tally-Press F11-Features-F2 for Inventory Features-
- Active - Use Separate actual and billed quantity Columns as –Yes
8). Cost Centres:-
Example of Cost Centre are –- Department of an orgation-Finance,Manufacturing,Marketing,HR,Admin Etc
- Product/Service of a Company-Product X,Product Y, Product Z
- Individual such as Salesman -1,Salesman 2
- Go to Gateway of Tally > Press F11 Features- F1 for Accounting Features-
- Activate-Maintain Cost Centre-To Yes > Maintain more than one cost category to Yes and Accept the features
9). Invoice No Number Creation:-
- Gateway of Tally-Accounts Info-Voucher Types- Alter- Sales-
- Method of Voucher Numbering- Select -Automatic-
- Use Advance Configuration-Set-Yes-Voucher Type Alteration Screen Display-
- Ask –Starting no, Width of Numerical Part- From date-Prefix & Suffix Details
- Example : TRP/00001/2020-21
10). Report Shortcuts Relating to Tally.ERP9.
All short cuts from Gateway of Tally-- Purchase Register Required – D+A+P
- Sale Register ” - D+A+S
- Cash/Bank Book ” - D+A+C
- Journal Register - D+A+J
- Any Ledger Required - D+A+L
- Receivable Outstanding - D+S+O+R
- Payable Outstanding - D+S+O+P
- Outstanding Ledgers - D+S+O+L
- Cost centre Breakup Reports - D+S+C+O
- Physical Stock Register - D+I+P
- Stock Movement Analysis - D+I+M
- Cash Flow - D+C+C
- Funds Flow - D+C+F
- Negative Stock - D+X+N
- Negative Ledgers D+X+L
- GST Reports- D+O+G
- TDS Reports - D+O+T
About Author

Pratibha Goyal
Admin
This Account belongs to Admistrator of Studycafe.
This Account belongs to Admistrator of Studycafe.
 Studycafe
 Delhi, Delhi, India
 1080
1080My Recent Articles
- Chartered Accountants Association Embraces Income Tax Faceless Proceedings
- CBDT condones delay in filing form 10IC for AY 20-21: Know upto when to file the form to take concessional tax benefit
- ICAI Announced date of Live Coaching Classes for CA Intermediate Nov 2022 Exam
- ICAI Announced Registration Date for Online Home-Based Practical Training Assessment
- ICAI Released Mock Test Papers Series for May 2022 CA Exam
Up Next
Loading suggestions…


Recent Posts


All Posts


Tags
No tags yet.
Recent Posts
All Posts
Tags
No tags yet.